Tag: GoogleEarth

3rd Grade 3D Shapes on the Earth

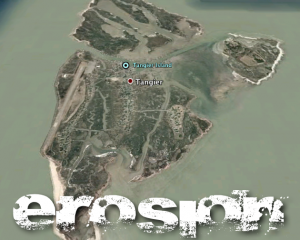
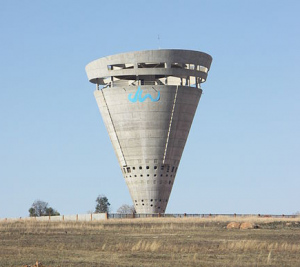
Third graders at Laburnum Elementary have been learning about plane (2D) and solid (3D) figures in Math (SOL3.14). Today students in Ms. Ford’s, Ms. Forrester’s, and Ms. Collins’ classes found examples of these shapes using the new web-based Google Earth. Google Earth is pretty awesome, and this is attested by the Oooh’s and Ahhh’s I heard in every classroom as the students opened it up. Many of the cities are in 3D so it’s perfect for finding real-life examples of the 3D shapes (if you want to see which places are in 3D here is a downloadable KMZ file from the GEarth Blog). However, while rectangular prisms and cubes are fairly easy to find, other shapes like cones and spheres are more difficult. So I created a KMZ file that the students downloaded (you can download it here or see the map here). Then in Google Earth, the students clicked the gear (settings) to allow KMZ uploads and went to Bookmarks to upload my KMZ file. Now all the places were available to the students by clicking on the folder in their bookmarks (click the eye icon to make them visible or invisible). First we explored shapes in Richmond. The students were surprised to find out that there is a pyramid right here in Richond! I showed them how to take screenshots of the places they found and save them. Then I let them explore and try to find examples of each shape on their own. We uploaded our screenshots to a Padlet to share with our classmates. You can see them all here: Forrester, Ford, Collins.


5th Grade Ocean Tours

Fifth graders at Holladay Elementary have been studying the ocean floor in Science (SOL5.6), so today students in Ms. Haislip’s class created undersea tours with Google Earth and Screencastify. First we opened up Google Earth and I showed them how to put placemarks on the different features (continental plain, continental slope, continental rise, abyssal plain, trench, ridge, seamount, etc). I also demonstrated how they could go “underwater” and change the angle of the view by clicking and dragging the wheel in the top right corner. Once their view was just right, they clicked the yellow thumbtack button to add a labeled placemark on the spot. The placemarks appear in a list on the left side under “My Places.” When the students double-click a placemark from the list, Google Earth automatically takes them to that same view that was saved. Once all the placemarks had been created, it was time to record the tour using Screencastify. Screencastify is a Chrome extension that records the screen and lets you add an audio voiceover. Students worked with partners to “travel” around the ocean floor describing each feature. Screencastify saves the videos to Google drive, so it was easy to copy and paste the links from there to Google classroom. You can take a look at some of their projects here.


4th Grade Primary Sources

JuxtaFourth graders at Davis Elementary are learning about primary and secondary sources (VS.1a), so today students in Ms. White’s and Ms. Bennett’s classes collected and analysed their own primary sources. First we discussed primary sources and why they are valuable. We looked at some Civil War photos, some photos of Abraham Lincoln, and a contemporary painting of George Washington. The students correctly identified all of these as primary sources. I explained that they would be going back in time today to take a photograph of a place, and then we would be comparing that old photo with a modern one. First we opened up Google Earth, and I told them to find a place in which they were interested. We discussed examples like their neighborhood, a favorite vacation spot, or a place that was important to their family. We zoomed in fairly close, so we were able to see roads and buildings. Next I showed them how to use the timeline feature and we went back in time. I asked if this was a primary or secondary source. We figured out that it was a primary source because it was a photograph taken by a satellite at that time. We used the Snipping Tool to take a screenshot of the place and saved it to our desktop. Then we dragged the timeline to the present and took another screenshot. We combined the two images using a cool webtool called Juxtapose. The images have to be hosted online to get the links, so we uploaded them to Comemories. Then we copied the links and pasted them in Juxtapose. Juxtapose turns them into a before/after comparison complete with a slider. The students could now compare the images and see how the places changed over time. Take a look at some student examples here.


5th Grade Ocean Floor Diagram

KasmiraFifth graders at Holladay Elementary have been studying the ocean (SOL5.6) in science, and they have been learning about line graphs in math (SOL5.15). So today Ms. Haislip’s students made line graphs of the Ocean Floor. First we had to collect our data. I showed them how they could use Google Earth to find the ocean depth at various spots. The goal was to take measurements at different places (the continental shelf, the continental slope, the continental rise, the abyssal plain, a sea mount, and a trench), and then enter that data into our spreadsheet. To save time, different groups of students could find a specific feature and share that measurement with the class. Next we opened a Google spreadsheet and wrote down the different features in the first column. We entered the depths in the second column. I explained that they would need to duplicate some of the measurements so that we would have a couple of points to plot (for example, the abyssal plain would need at least 2 equal points in order to make a straight line). Then I showed them how to make a line graph out of the data (it was actually an area graph so that it could be filled in with a color). I let them figure out how to adjust the data so that the resulting graph looked like the ocean floor. They learned the difference between negative and positive numbers very quickly! The final step was to customize the color and size and publish their graphs. I took screenshots using the snipping tool and posted them to CoMemories (which is a quick and easy way to share pictures). You can see their graphs here.


3rd Grade Ancient Greece Math

greecemathThird graders in Ms. Leo’s class at Varina Elementary have just started learning about ancient Greece (SOL3.4) so I wanted to take them on a tour of Greece using Google Earth. I created a .kmz file with placemarks on important sites like Olympia, where the first Olympics were held (you can still see the track they ran on), the Parthenon (if you turn on 3-D Buildings you will see it), and Mount Olympus (the highest mountain in Greece where they believed the gods lived). But since my focus this year is on math and writing, I had them to measure the distances between the sites using the ruler tool and write some word problems about those distances. I created a Numbers spreadsheet with a lot of the information pre-loaded, that you can download by clicking here. First the students entered the distances into the spreadsheet. Then they came up with questions about the distances. We talked about clue words for addition (“all together” or “in all”) and subtraction (“how much further” or “how many more”). They made up word problems about Greek characters traveling to the different places and gave reasons why they would visit each place (in order to review what was there). Next they rounded the numbers and got an estimate. Finally they solved each other’s problems, and I had a formula that would check if they were correct when they clicked the red “Check” box.


5th Grade 3-D Ocean Model

Screen shot 2013-12-08 at 3.36.44 PMFifth graders in Ms. Payne’s class at Laburnum Elementary have been studying the ocean (SOL5.6), and she wanted me to help them review the different parts of the ocean floor. One of my goals this year is to help our students improve in math, so I’ve been trying to incorporate math into as many of my lessons as possible. I figured we could use the 3-D area graph in Numbers to create a model of the ocean and then import it into Keynote to animate it like this example. I wanted the students to gather their own data, but just graphing that wouldn’t produce a good looking model. So I created a template that you can download by clicking here that takes the data they enter and turns it into a model of the ocean floor. The students used Google Earth to gather the data for the graph. First I told them to find a continental shelf and measure the depth. Google Earth automatically tells the ocean depth or land elevation for whatever spot your mouse is hovering over… just be sure it’s in meters and not feet or my formulas won’t work (you could add a bit more math by having them convert the units). Next the students find a continental slope, continental rise, abyssal plain, and sea mount to measure. After entering all that data, I told them to do some research online to find the depth of the Mariana Trench. I gathered a bunch of sites for oceans research into a BundleNut that they could use, but one of the coolest infographics I found was this one. Once they entered that last bit of data, the 3-D graph should look like a model of the ocean floor. Then they copied the graph and pasted into a Keynote to animate it. Keynote has a sharp-looking animation for graphs called “3-D grow.” The students used text boxes to label the different parts, and the final step (if we got to it, which we didn’t) would be to record a voiceover explaining each part of the ocean floor.


Kindergarten School Maps

kmapKindergarten students at Holladay Elementary have been learning all about maps (SOL K.4 & K.5) so today they created simple maps of their school. First I showed them how to find their school in Google Earth, and I pointed out that maps show how places look from above. Next we opened a Pixie template that included a screenshot of the school from Google Earth and a few map symbols to include. You can download the template with the symbols by clicking here (just add a picture of your own school). Students identified the places in the school (playground, cafeteria, track, etc) and dragged the correct map symbols to the map. We discussed the purpose of the map key or legend, and I explained that they would be adding their own symbol to the key. Using the paint brush tool, the students traced over the roads in the picture, then they added a mark in the key to identify the symbol (color) they used for the roads. Finally the students added their own photo and name. You can see a student sample by clicking on the picture.


2nd Grade Erosion Plans

Picture 4Second graders at Laburnum Elementary have been studying weathering and erosion (SOL2.7). They have also been learning about ways to prevent erosion (SOL2.8). So today I showed them a real life example of where erosion is causing serious problems right here in Virginia. We opened Google Earth and I guided them to find Tangier Island. We zoomed in and I told them to look for evidences of erosion. They were able to spot them quickly. I had traveled with the Virginia Trekkers to Tangier Island and met with the mayor there, so I was able to share with the students some of the concerns he has about controlling the erosion. I asked them to come up with a plan to prevent erosion on Tangier Island based on what they had learned. They were going to present their plan using Garage Band. First we took a screenshot of the erosion on Tangier Island from Google Earth. I showed them how to drag the picture into Garage Band. Next the students recorded their voices explaining their plan. Finally we added some music and sound effects (such as waves and other water sounds). We exported their podcasts as QuickTime videos. You can see two student examples here and here.


Summer School 2011 “Lights, Camera, Action!”

During the week of July 25-28 I taught a summer school class at Springfield Elementary called “Lights, Camera, Action!” I had rising 4th and 5th graders and our goal was to create educational videos for teachers to use in their classrooms about different famous people. Students chose to work with a partner or solo, and they selected a famous person to research. They created all the parts of the video themselves, including the animations and music, using software on the computer (Photo Booth for the interview/green screen, Keynote for animations, Google Earth for satellite imagery, and iMovie for video editing) as well as web tools (SitePal for voiceovers, Aviary Education for soundtracks, Screencast-O-Matic for recording, and Blabberize for the “talking heads”). You can see my sample below and take a look at all the student samples on this website. Be sure to leave a comment on the videos to let my summer school students know what you think of their projects!

Woodrow Wilson from Henrico Students on Vimeo.


5th Grade GoogleEarth Video Tours

Fifth graders have been learning about the regions of the United States, which is a new SOL for them this year. Here’s a cool project you can do with your students to highlight the special features and landmarks of each region. Open GoogleEarth and be sure that 3D buildings is turned on (it’s in the left side panel). Then zoom in on features and famous landmarks in the region and place pushpins to mark the locations. Finally click the “Record a Tour” button in the top toolbar (it looks like a video camera) and click the pushpins in the “My Places” menu. As you zoom to each place, record yourself narrating the important information. You can save the video as a .kmz file which would open in GoogleEarth on any computer. However, if you want to add titles or a soundtrack, you could use a screen capture tool like Screencast-O-Matic, save your video and open it in iMovie or GarageBand. Take a look at this student sample about the midwest region from Chamberlayne Elementary. Let me know if you’d like me to help teach a lesson like this in your classroom!