1st Grade Maggie Walker Research

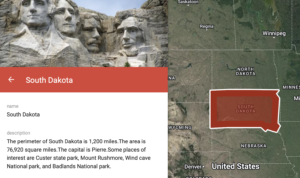
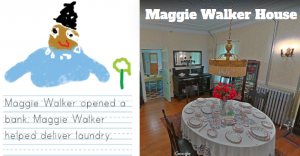
First graders at Pemberton Elementary have been learning about two famous Virginians Maggie Walker and Arthur Ashe (SOL1.3d,e), and they have been learning how to conduct research (SOL1.14). So today, students in Ms. Hutton’s class researched Maggie Walker and shared their findings using ABCYa! StoryMaker. I showed them how to use the microphone feature on Google to ask any questions they had about Maggie Walker. It was great listening to all their curious questions! One student’s question even led to an interesting discovery for all of us. He asked, “Did Maggie Walker have a car?” We found out that she did, in fact, sell her horse and carriage to purchase an electric car in 1910. Wow! I didn’t even realize they had electric cars in the early 1900s. There’s a fascinating article about it here, if you’d like to learn more. I love it when students teach me things! We also took a virtual field trip to Maggie Walker’s house, right here in Richmond, using Google Maps. When we dragged the yellow street view man to her house, we realized that we could even explore inside her home (see photo)! After learning so many amazing things about Maggie Walker, we went to ABCYa! StoryMaker and typed complete sentences about her, using capitals and periods (SOL1.13). Then we drew a picture of her with the drawing tools and shared our reports on SeeSaw. You can see them all here.


4th Grade Animated Famous Virginians

Fourth graders at Varina Elementary have been learning how to use online, reliable resources for research (SOL4.9), and they have been studying famous Virginians (VS.9). So today students in Ms. Belcher’s and Ms. Connell’s classes used this website to choose a famous Virginian and discover some interesting facts about them. Since we would be drawing our person, we did a Google image search for them to see what they looked like. We looked at their hairstyle, their clothing, and whether or not they wore glasses or facial hair. Next, we navigated to a great animation tool called BrushNinja. It’s free and doesn’t require a login. I explained that animation is basically a series of still pictures that are played one after another, kind of like the flip pages in Captain Underpants books. We drew our person on the first page, then duplicated the page several times and changed the mouth and the eyes in each image, so it looked like they were talking when we hit the play button. Before we exported our animation, we clicked the settings button at the top (the gear icon) to remove the background and slow down the frames per second. Then we saved our animation as a GIF file. The second step was to record audio of the person telling about their accomplishments using another great, easy-to-use web tool called Vocaroo. We downloaded the recording as an MP3 file. The final step was to combine the animation and the audio into a Google slides presentation. A new feature of Google slides is the ability to add sounds, but you have to save the MP3 files in a shared Google folder. I showed the students how to create a folder in their Google drive, share it, and upload the MP3 file into it. Finally, we made a Google slide, added a background image that related to our person, and uploaded the animation and sound files. They turned out really great! You can see them all here.


3rd Grade Environment Posters

Third graders at Varina Elementary are learning about human influences on the environment (SOL3.10), so today students in Ms. Galvin’s class created environment posters using several different webtools. First, we discussed ways that humans impact the environment either positively or negatively and related it to the current wildfires happening in Australia. Some humans are fighting the fires and protecting the animals, while other humans are causing the fires to spread. I recorded their ideas on the board and instructed students to choose one for their poster. Next, each student did a Google image search for a background image and downloaded it to their Chromebook. Then, we took a selfie using Pixect with an expression showing how we were feeling about the background image. I like Pixect for taking selfies because it’s easy to use, it has a timer, and it features some cool effects. Since we wanted our background image to be the one we downloaded earlier, we removed the background with RemoveBG. If you’ve never tried that tool, it’s really amazing. It automatically detects the background in a photo and deletes it in a matter of seconds! Finally, we combined the background image with our selfie using a tool called ToonyTool. With ToonyTool, you can add a background, a character (our selfie), and speech bubbles and text. The posters turned out great! You can see them all here. UPDATE: With Ms. Lanham’s class we added elapsed time to the posters (SOL3.9b) and added them to the document.


5th Grade Midwest Region Math

Fifth graders at Laburnum Elementary have been exploring the midwest region of the United States in Social Studies, and they have been learning about perimeter and area in Math (SOL5.8). So today, students in Ms. Hall’s class used My Google Maps to find the perimeter and area of a midwestern state and create a brief state report. First, we reviewed the states in the midwest region: Illinois, Indiana, Iowa, Kansas, Michigan, Minnesota, Missouri, Nebraska, North Dakota, Ohio, South Dakota, and Wisconsin. The students chose one they found interesting and researched it online to make sure it was the state they wanted to do. Next, we went to My Google Maps and clicked “Create a New Map.” We changed the title to the name of our chosen state. Then I showed them how to use the drawing tool to draw an outline of the state. I also showed them how to customize the line thickness and the fill color (after you save the shape, click the paint bucket tool). One of the cool features of My Google Maps is that it shows you the perimeter and the area of any shape you draw. So the students typed the perimeter and area of their state in the pop-up information box, with the correct units: miles and square miles. They also added some of the facts about their state that they discovered in their research. We clicked the camera icon to add a few photos of our state. Finally, with the extra time we had at the end, I demonstrated how they could search for their school and put a pin on it. The pin can be customized, as well, by clicking the paint bucket tool. We shared our maps so anyone with the link could view them, and we pasted the links in Schoology. You can see some of their projects here.


3rd Grade Moon Phases with Scratch

Third graders at Varina Elementary have been learning about the four major phases of the moon (SOL4.6c), so today students in Ms. Goode’s class used coding and Scratch to create a moon phases activity. First we reviewed the phases of the moon with PBSLearningMedia, NASA, EarthSpaceLab, Moon Phase Simulator, and we even got to see which phase of the moon is showing tonight in Richmond. Next, we logged into Scratch, and the students added a space background. Then I showed them how to add their own “sprite” as a drawing. We drew a circle shape for the moon and filled it in with the paint bucket. This would represent the full moon. Then we duplicated it three times and added shading to represent the first quarter, third quarter, and the new moon. In the code for the moon, we programmed it to switch costumes every three seconds. The last step was to add another “sprite,” or character and code it to say the correct phase every three seconds. We tested our programs to make sure they worked, then we published them and shared the links in Schoology. You can take a look at some of the projects here.


Tags:


5th Grade Light & Sound Animations

Fifth graders at Laburnum Elementary have been studying light (SOL5.6) and sound (SOL5.5) and their various wave frequencies, so today students in Ms. Johnson’s class showed what they have learned by making animations. First we reviewed light and sound waves and their appearance so we could illustrate them correctly. We looked at a virtual oscilloscope, generated our own wave frequencies with Wave on a String, and explored different visualizations with Seeing Music. We even explored a 3-D model of the human ear to see how we hear sound waves. Although we didn’t get to explore light (a good site for experimenting with the light spectrum is Physics Classroom), I did remind them that colors on the red end of the spectrum have lower frequencies, and colors on the violet side of the spectrum have higher frequencies. It was now time to create our animations. We went to BrushNinja, and the students drew a creature or an object that made sound. Then they decided if it produced low frequency or high frequency sounds, and they illustrated the sound waves. If they had time, they illustrated the light waves as well. Some students even identified the angles in their drawing as acute, right or obtuse since they are learning about angles in Math (SOL5.12). They downloaded their animations as GIF files and posted them to Schoology with a description. You can check out some of their animations and descriptions here.


2nd Grade Animal Habitat Animations

Second graders at Holladay Elementary are learning about animal habitats in Science (SOL2.5), so today students in Mr. Reams’ and Mr. Gunter’s classes created animal animated GIFs with sound. Usually GIFs don’t have audio, but we attempted a workaround. First, we reviewed different habitats (woodlands, rainforest, grasslands, desert, arctic, ocean, freshwater, etc) and the animals that live in each. Then, we went to BrushNinja and added a background image of the habitat. Some students chose to draw their own background while others used the built-in photo search. Next, they used the drawing tools to draw an animal that lives in that habitat. I showed them how to duplicate the frame at the bottom and make slight changes in their animal drawings to make it appear like it’s moving. I pointed out that their animal will be speaking so they need to animate the mouth. We discussed different ways to draw the mouth in each frame so it looked like it was talking: an 0 shape, a straight line –, with teeth showing, with the tongue sticking out, etc. When they finished their animations, they exported them as animated GIFs and uploaded them to a Schoology discussion. To add the audio, I showed them how to reply to their own post in Schoology and click the microphone button to record. I later combined the audio with the animations in WeVideo. You can see their finished projects here: Mr. Gunter & Mr. Reams.


5th Grade Coding Figurative Language

Fifth graders at Trevvett Elementary have been learning about figurative language (SOL5.4d) in English, so today students in Mr. Golden’s class used Scratch and coding to create interactive posters with figurative language. First, we reviewed different examples of figurative language: simile, metaphor, personification, hyperbole, and alliteration. Then we logged into Scratch, and the students chose a background and a character (sprite). They also created two buttons and wrote a type of figurative language on each. In the code for each button, they used the “Broadcast Message” block so that when the button is clicked, it would send a message to the character. Next, they created three costumes for their character. One costume would give the directions and the other costumes would give examples of figurative language that related to the character, background, and situation. Finally, the students added code to the character so that when it received a message from a buttons, it would say the correct thing. So if the user clicked “Metaphor,” it would give an example of a metaphor. You can try out some student examples here.


Tags:


4th Grade Parade Floats

Our local high school is going to put on a parade this summer, so the fourth graders at Trevvett Elementary have been tasked with designing the float for their school. They asked me to help them develop prototypes, and then they would vote on the best one to actually build. I decided to show them Tinkercad because they could create 3-D models of their float ideas and print them on the 3-D printer. First, we discussed parades and floats they had seen before. What made a float memorable? How do you think they were constructed? I showed them this slideshow with sample floats for inspiration. The theme for our school’s float is “Creativity,” one of the HLP categories we have been focusing on this year. How do these sample floats showcase creativity in their materials and design? Next, we went to Tinkercad and I explained how to use the tools, modify the 3-D shapes, and make holes and text. They have been learning about solid geometric figures in Math (SOL4.11), so we identified the various shapes as we used them. After the students designed their floats, they took screenshots of them, and shared them in a Schoology gallery. You can see some of their designs here.


Tags:


5th Grade Anti-Bullying Video

A group of fifth grade girls at Varina Elementary asked me to help them make an anti-bullying video for their school. They had written their own song and even choreographed some dance moves to go along with it! They just needed some tools for creating the beats and recording the video. I showed them ButtonBass for making the beats. You can click different cubes at the top of the webpage for different genres. Then click different squares on the cube to add in beats, synthesizers, and even vocal samples. It’s easy to use and no login is required. Other great websites for making music and beats are: Incredibox, Chrome Music Lab, TypeDrummer, and SuperLooper. Next, for recording the video we used Pixect because it has special effects you can add to your video. If you don’t need special effects, another easy-to-use site that let you record video from a webcam is Webcamera.io. Their video turned out great, as you can see here. UPDATE: I included their project, along with another group’s project in my workshop on Creativity.


Tags: