Tag: GoogleDocs

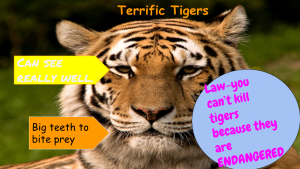
2nd Grade Extreme Weather Skip Counting Maps

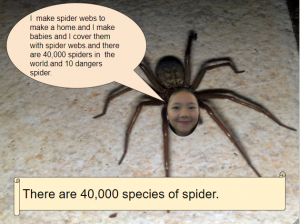
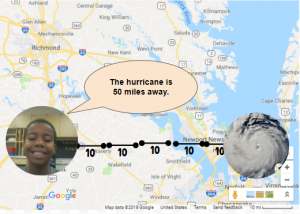
Second graders at Laburnum Elementary have been learning about extreme weather in Science (SOL2.6), skip counting in Math (SOL2.2a), and map skills in History (SOL2.1b). So today, students in Ms. Pope’s class reviewed all three concepts with a Google Drawing project. First, the students decided if they wanted to skip count by 2’s, 5’s, or 10’s, and they chose the corresponding template (you can copy each template by going here). Next, we right-clicked on one image holder and replaced it with a picture of some type of extreme weather (hurricane, tornado, blizzard, flood, etc.) using the “Replace image > Search the web” button. We added our own photo to the other image holder using “Replace image > Camera.” I encouraged the students to look surprised or scared in their photos since the extreme weather was heading their way! Now it was time to practice skip counting. We moved the map scale segments from the bottom to create a line showing the distance from the weather image to our photo. Then we skip counted the segments. Finally, we changed the words inside one of the speech bubbles to say something like, “The weather is ___ miles away.” You can see all their projects here.


3rd Grade Animal Research

Third graders at Trevvett Elementary have been learning about animal adaptations in Science (SOL3.4) and place value for six-digit numbers in Math (SOL3.1a). Today students in Ms. Hufnell’s class used their research skills to find images and facts about an animal of their choice, including how many exist. This gave us the opportunity to review and read large numbers up to six digits. First, we made copies of a Google drawing template (you can make your own copy here). Then, students clicked the Image button and did a Google image search for their animal. When we added the picture, we noticed that it covered the speech bubble, so I showed them how to click Arrange > Order > Send to back. Next, they clicked the Image button and chose “Webcam.” Each student took a photo of their own face to put in place of the animal’s face. To make it more realistic-looking, we used the cropping tool to make the face into a circle shape. Students typed complete sentences in the speech bubble explaining their animal’s adaptations. Finally, they asked Google: “How many (of my animal) are there?” and they wrote the number in the scroll shape. They could change the color of the speech bubble and scroll with the paint bucket tool when they finished. We shared our projects with each other on Schoology, but you can see them all here.


2nd Grade “Mystery Me” Introductions

Second graders at Laburnum Elementary got to know each other better today with a fun “Mystery Me” activity. First, they went to Pixect and took a photo of themselves. Pixect is a great tool for taking quick webcam photos. It has an array of filters and timers available to use, but we just saved the photo and uploaded it to FacePixelizer, where the real magic happens. FacePixelizer is another great tool with many instructional uses. We used it today to pixelate our faces, but it can be used to make anything in a photo unidentifiable and mysterious: pixelate a book title, a weather instrument, or an animal, and students can try to guess what it is from various clues. It’s simple to use. Just click and drag across the area you want to pixelate. The amount of pixelation can be adjusted with a slider. Once we pixelated our faces, we downloaded the images and added them to a Google slideshow template that I gave them. The first slide was titled “Who Am I?” with two sentence starters: “I like…” and “I have….” The students completed the sentences with clues about themselves. On the next page they typed “I’m (Name)” and uploaded their original photo from Pixect. When they were finished, I combined all their slideshows together and added a Dissolve transition between them, so the pixelated photo gradually revealed the mystery student. You can see a few student samples here.


3rd Grade Matter Transitions

Third graders at Varina Elementary have been learning about matter and how it changes states from solid to liquid to gas and back to solid again (SOL3.3). Today students in Ms. Galvin’s, Ms. Long’s, and Ms. Hummel’s classes used Google slides and Scratch to show different types of matter changing states. Ms. Hummel’s class focused on water in their Google slideshows. We used the Transitions feature to animate pictures of water fading from solid ice to liquid or from liquid to water vapor. Ms. Galvin’s and Ms. Long’s classes chose different types of matter that can melt and freeze (like chocolate, ice cream, and Popsicles). First, they drew two costumes for their object (the solid state and the liquid state). Then they added code so that clicking the object changes its state, or costume. Some students also added code for their objects to “say” a fact about the state of matter. When their projects were finished, we published them online and shared the links on Schoology. You can see them all here.


3rd Grade Animal Habitats Graph

We’re on an animal habitats streak here! In previous posts I’ve shown how your habitats unit (SOL3.4) can reinforce the skills you are teaching in Social Studies and Reading. Now we’ll see how it can reinforce Math concepts as well. At Trevvett Elementary, third graders have been learning about graphing (3.17), so today students in Ms. Bae’s class practiced graphing animal’s habitats. First we had to collect some data. I used Fobio to convert a Google form into a chatbot to make the process a bit more interesting. You can try the chatbot out for yourself by clicking here. Once the students had entered their information, I took a screenshot of the results spreadsheet and posted it to Schoology (step 2 in the graphic accompanying this post). Next the students opened a blank Google spreadsheet and typed the habitats in Column A and the number of animals in Column B. I showed them how to use the new “Explore” feature by clicking the star shape in the bottom right corner. From the pop-up window they could change the colors of the rows and automatically add a bar graph (step 3 in the graphic). I explained that they could also change the colors of the bars by double clicking on one of them, then clicking the paint bucket in the pop-up window. The students shared the links to their spreadsheets on Schoology. You can see an example here. (UPDATE: The next day at Holladay, Ms. Haley’s class combined Math & Science by writing math word problems about animals. See them here).


3rd Grade Animal Rules & Laws

Third graders at Holladay Elementary have been learning about the difference between rules and laws in Social Studies (SOL3.10a), and they have been studying animal adaptations in Science (SOL3.4). So today students in Ms. Whittaker’s class created slideshows that identified animal adaptations and also included a rule or a law about that animal. First they opened a blank Google slideshow, and I showed them how to add a background image of their animal. Next we added some shapes to point out different features on the animal (Example – deer have antlers to fight with). If the students needed to do some research, they could open a new tab and do a quick Google search. I demonstrated how to change the color and type a fact in each shape. Then we added another shape and typed in a rule or a law about the animal (Example – Rule: Don’t feed the deer; Law: You can only shoot two deer with antlers per season). Finally, we used the Transitions button to add animations to the shapes. Students shared their slideshows on Schoology, and you can see them all here.


5th Grade Multiple Meaning Words

Fifth graders at Trevvett Elementary have been learning about words with multiple meanings and homophones (SOL5.4). Today students in Ms. Brown’s class created a Google slideshow to illustrate two different meanings of a word or a pair of homophones using context clues. First we utilized the Schoology discussion feature to brainstorm multiple-meaning words. You can see a short sample of the discussion by clicking on the photo accompanying this post. Notice the student names and photos are blurred out. You can do that using a cool site called FacePixelizer. Next the students opened a blank Google slideshow (the quickest way is to give them a direct link to their Google slides). I showed them how to search for an background image that isn’t too distracting by clicking the Background button > Image > Choose > Search. Some good search terms to use are “texture” or “bokeh” (blurred lights). Then we changed the title to “Multiple Meaning Words” and added their name to the subtitle. I also demonstrated how they could change the font, size, and color of the words. On the next slide we typed a sentence using both meanings of the word or homophone, and we underlined them. I explained how to add transitions and animations to the slide as well. Finally, I showed them how to add an image illustrating the sentence. We shared our slideshows with each other on Schoology. You can see them all here. (UPDATE: I taught a similar lesson with Ms. Hall’s class at Holladay on 10/10, but we did it a little differently. I have added them to that page).


5th Grade Review with Chatbots

Fifth graders at Holladay Elementary have been reviewing for exams, so today students in Ms. Neal’s class created review questions for each other in the form of a chatbot. A chatbot is an online virtual assistant that you’ve probably already had interactions with if you’ve used the chat feature on a business website. The chatbot is programmed to ask you questions and give replies based on your answers. We used a website called Fobi.io which turns any Google form into a cool-looking chatbot. First we created the Google Form by going to our Google drive and choosing New > More > Google Forms. I explained that the first question should be: “What is your name?” Then the students had to come up with two multiple choice educational questions about any topic they’ve learned about this year in 5th grade (we brainstormed a list of topics, in case they had trouble remembering). They could also create additional questions of their own if they had time. We published our forms by clicking the “Send” button and copied the link. Next we went to Fobi.io and pasted the link to our form. Now we could program the chatbot Fobio to reply to each of the questions. For example, if an answer was correct, he could say, “Great job!” or if it was wrong, he could say, “Try again!” The students were very creative in their responses. You can take a look at some of their chatbots here.


2nd Grade Student-Created Money Quizzes

Second graders at Holladay Elementary have been learning how to count and compare a collection of pennies, nickels, dimes, and quarters whose total value is
$2.00 or less and correctly use the cent symbol, dollar symbol, and decimal point (SOL2.10). Today they created their own money quizzes using Google Drawings and Google Forms. First we had to use Google Drawings to create the image of money to use in our quiz. We went to our Google drive and clicked New > More > Google Drawings. Then we clicked the Image button and clicked “Search” to find pictures of the bills and coins we needed. I explained that students could make any amount of money up to $2.00, but they had to know how much money it was for their quiz. When the students were finished making their money picture, we clicked File > Download As > JPEG Image. Then we went back to our Google Drive and clicked New > More > Google Forms. They titled their form, “Money Test” and wrote the question, “How much money is this?” Next, they typed in several answer choices, making sure to include the correct one. We also clicked the Add Image button to upload the money drawing that we created. Finally, to turn the form into a quiz, we clicked Settings (the gear icon) > Quizzes and changed it to a quiz (you may want to change some of the other settings as well). We marked the correct answer choice, clicked “Send,” copied the link, and pasted it to Google classroom so everyone could take our quizzes. You can see them all here. (NOTE: I taught a similar lesson with Mr. Williams’ 5th graders at Varina Elementary where we created quizzes for finding perimeter, area, and volume here)


5th Grade Circles On The Earth

Fifth graders at Laburnum Elementary are learning about circles and their measurements: circumference, diameter, radius, and chord (SOL5.9). Today students in Ms. Henry’s class learned how to show those measurements with Google Drawings and Google Earth. First I gave them each a copy of a blank Google slideshow in Google classroom. We created a title page on the first slide, and on the second slide I showed them how to use the shapes tool to make 4 circles (hold Shift while clicking and dragging the circle to make it perfectly round). We used the paint bucket tool to change the fill color of the circles, and they discovered another new feature that I didn’t know about (I already mentioned in this post, how students found the gradient feature). If you click Custom at the bottom of the colors panel, you can adjust the fill colors’ transparency! Next, I showed them how to use the Line tool to draw a radius, diameter, and chord on different circles. We changed the color of the lines and their thicknesses using the buttons in the toolbar. Then we labeled each measurement with a text box. For the last slide I wanted them to find a real life circle in Google Earth and measure its radius, diameter or a chord. So we went to Google Maps, clicked the Google Earth button in the bottom left corner, and searched for circles. TIPS: Look near rivers for water treatment plants, look out west for crop circles (the panhandle of Texas especially), look on the roofs of buildings for fans, look in backyards for pools and trampolines. To make a measurement, right click where you want the line to start, choose “Measure distance,” then double-click where you want the line to end. Finally, students took a screenshot of their real life circle (using the Snipping Tool) and pasted it to their slideshow with a text box explaining the measurement. You can see all their slideshows here.