Search Results for "civil war"

4th Grade Civil War Marching Maps

Capture
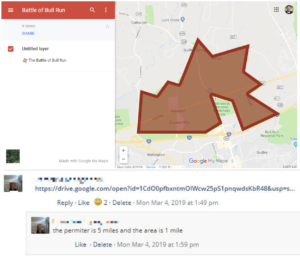
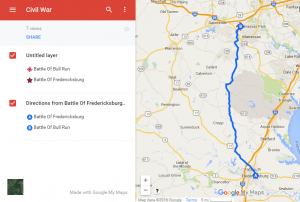
Fourth graders at Holladay Elementary have been learning about the Civil War in Social Studies (VS.7) and measurement in math (SOL4.7) so today we created Civil War Marching Maps using My Google Maps. First the students chose two major Civil War battles to mark on the map (Bull Run, Fredericksburg, Richmond, Appomattox, or Hampton Roads). Then they added an image and some brief factual information about the battle to each marker. Next we clicked on a marker and chose the directions icon at the bottom of the popup window (it looks like an arrow). That added a new layer to the map legend on the left with the location marked as “B”. We added the name of the other marker in the “A” box, and clicked the three dots to choose “Step-by-step directions.” That gave us the distance in miles. However, the time wasn’t accurate because it was based on driving, whereas the Civil War soldiers marched. So we clicked the car icon and changed the Transportation mode to walking. Now students had an estimate of how long it would take for the soldiers to march from one battle to another. Yet that still was not accurate because soldiers didn’t march nonstop. They averaged 15-30 miles per day, so students could divide the distance by 20 or 25 to figure out how many days it would take for Civil War soldiers to march that distance. Students shared their maps on Google classroom, and you can see them all here.


4th Grade Civil War People

noahFourth graders in Ms. Cousins’ class at Davis Elementary have been studying the Civil War for several weeks now (SOLVS.7), and today they wanted a fun way to review the important people. I listed all of them on the board and the students chose one that they wanted to research. I explained that they would be making animated characters using Voki and they should try to make them look as much like the real people as possible. So part of their research involved looking at old photos of them. I showed them how to change the skin, hair, and eye color, and how to add different backgrounds and clothing. Once their character looked relatively realistic, they clicked the voice tab and chose text to speech. They typed a few facts for their person to say, explaining who they were and their important accomplishments. Then I showed them how to pick an accent, which is one of the best parts! Another thing I really like about Voki is that students can publish their creations without having to create an account. So each student published their animation and saved the link to their folder. I put all the links together on one Google Doc that you can see here.


4th Grade Civil War Instabloggs

timelinesampleEarlier, on this post, I described a lesson where students created Civil War timelines using TimelineJS. I was teaching that lesson today with a different group of students at Holladay Elementary and wanted a good way for them to save and display their timelines. Instablogg is one of the best sites I have found for students to easily publish projects that have an embed code. I like it because there is no sign in required, it allows comments, and it gives students a link where they can go back and continue editing. To add embed code, you just click on the “Code” button. We did find that we couldn’t use the exact embed code that TimelineJS gave us, so I showed them how to go into the code and adjust the size to this: height=”650″ width=”600″ and that seemed to work well. You can see all the students’ Instabloggs by clicking here (but remember that the timelines will all be the same since they use data from the same spreadsheet).


4th Grade Civil War Timelines

Picture 2Fourth graders at Chamberlayne Elementary are currently studying the Civil War. There are a lot of people, places, and battles they have to remember, and making a timeline helps keep everything in perspective. My supervisor, Tom Woodward, just told me about a cool webtool, TimelineJS, that can create a timeline from a Google spreadsheet. So I decided to try it out with the fourth graders today. First I set up a Google Spreadsheet for each class using the template found on the website. Then the students choose a partner to work with, and we generated a list of people, events, and battles from the Civil War. Each team selected one topic and conducted some very quick research. They also found a picture and made a Google Map to embed in the timeline. They were assigned rows on the spreadsheet corresponding to their student numbers (it doesn’t matter if the events are listed in order on the spreadsheet… the webtool sorts it all out). They entered the information into the correct columns and copied/pasted the link to the picture or map. It was a great example of crowdsourcing because in just a few minutes we had collected enough information to make a timeline about the Civil War without having to enter all the data individually. What’s really cool is, each student can use the same data to create their own customized timeline. All they need to do is copy the document link into the TimelineJS Embed Generator, choose the font and style they like, and press a button! I have some samples I created as well as the student projects linked here.


5th Grade Civil War Timeline

Fifth grade students have been reviewing the Civil War (VS.7). So to keep all the major events in order they created animated Civil War timelines using Keynote. I gave them a template and a folder of pictures to use that you can download by clicking here. They added the dates and the events in the correct places along the timeline. Next they added animation using the Inspector so that each event appeared in the order it happened. If you have time you could use the voiceover feature of Keynote and record a narration explaining the events. To see a finished sample video click here.


Tags:


4th Grade Civil War Comics

The Civil War is a new SOL for the 4th grade this year so many teachers are looking for good ideas. One idea to help your students remember the major events in the Civil War is to create comics like this class did at Holladay Elementary. I gave them a template to use which you can download by clicking here. I also gave them a huge (31 MB) folder of pictures to use which you can download by clicking here. The students dragged the pictures they wanted into the boxes on the template, added their own text boxes and speech bubbles to explain the event, and then changed the style of the pictures and text to make it look interesting. You can take a look at some student samples displayed in a cool Prezi by clicking here. One of the neat things about sharing your students’ work in a Prezi is that you can embed it in a website like in the example. Let me know if you’d like to learn more about Prezi.


4th Grade Civil War iMovies

The Civil War is a new SOL for 4th grade this year, and I’d be happy to help you with ideas and resources. One 4th grade class made Civil War iMovies. Using the same folder of pictures that you can download on this post, students selected a topic and created an iMovie by combining the pictures with a video they recorded of themselves introducing the topic. Then they added transitions and text, and finally they selected a soundtrack to go along with it from the media tab. I exported them as QuickTime videos so they could be posted online. We did all of this in just one hour! Take a look at a couple of student samples: Harriet Tubman, Abraham Lincoln. One of the problems with iMovie is that the projects are saved to the computer’s hard drive instead of to the students’ folders. So that exporting step is important if you want to save them to the students’ folders. Otherwise, you could avoid this problem by doing a similar project in GarageBand. It wouldn’t have the video, but it would still have the pictures, voice, and soundtrack. You can download a GarageBand template to use by clicking here.


5th Grade Civil War Fact Opinion iMovies

Fifth grade students at Laburnum have been studying the Civil War in Social Studies, and they’ve been studying facts and opinions in Language Arts, so we decided to combine the two topics into one iMovie project today. I gave them a huge (30MB) folder of all sorts of Civil War pictures for them to choose from. You can download the folder of pictures by clicking this link. The students chose two pictures and came up with a fact about one and an opinion about the other. Then they imported the pictures into iMovie and added the text “Fact or Opinion” to each picture. Next they used the voiceover button to record their fact and opinion statements about each picture. Finally they used the video button to film themselves saying, “That is a fact!” or “That is an opinion!” and put their movie together by dragging the different components to the correct place. It was a great review of what they have learned and it also gave them practice using iMovie. You can see some student samples by clicking here and here.


Tags:


4th Grade Battlefield Perimeter & Area

Fourth graders at Trevvett Elementary have been learning about perimeter and area in Math (SOL4.7) and Civil War battles in History (VS.7b). Today students in Ms. Reed’s class used Google Maps to find the perimeter and area of Manassas Battlefield, where the Battle of Bull Run was fought in 1861. It was the site of the first major battle of the Civil War, and it’s now a national park. First, we explored it with regular Google maps so we could take a virtual field trip there. We turned on satellite view (bottom left corner) and clicked the yellow guy in the bottom right corner (also known as Pegman). When you click on him, you will see blue lines and blue dots. The blue lines show street view, but the blue dots give you a 360 degree view of those sites. Sometimes they are even inside of buildings and museums! So Pegman is a fantastic way to take virtual field trips (TIP: Try dragging Pegman over Hawaii or Nevada, and see what he turns into)! After exploring the battlefield in Google Maps, I asked the students to estimate its perimeter and area. I explained that in the next step we would actually measure its perimeter and area and see whose estimate was closest. My Google Maps is a great way to create, customize and save your own maps. To get started, we clicked the red button “Create a new map.” In the search box we typed “Manassas Battlefield” and arrived at the site. Then I showed them how to use the drawing tool to outline the battlefield. It took a bit of practice, but once the outline was complete, we gave it a title, typed a description, added a photo or two, and hit the Save button. When we clicked back on the outline, a box popped up with some cool features. We could change the outline and fill color with the paint bucket, but more importantly, it told us the area and perimeter of the outline! To finish the project, we clicked the Share button, changed the settings so anyone with the link could view the map, copied the link, and pasted it into Schoology. The students also typed the perimeter and area into the comments so they could compare their findings with their classmates’. You can see some of their maps and comments here.


4th Grade Social Studies Videos

Fourth graders at Laburnum Elementary have been reviewing the regions of Virginia (VS.2b) and famous people from the Civil War era (VS.7c), so today Ms. Mayer’s class created Social Studies videos on these topics to help them review. First, they chose a partner to work with and decided together on a Virginia region or a Civil War person to research. Next, we spent a few minutes looking over our notes and finding information online to share. I showed them how to download and save online images about their topic to use in their video. Then we logged into WeVideo to begin making our movies. WeVideo starts out in Timeline mode, which is a little complicated, so we switched to the simplified Storyboard Mode (click the three lines in the top left). Storyboard Mode already has a Title page set up in the timeline. We clicked the Edit icon on the Title page and typed our title, remembering to use capital letters. Now it was time to record our intro. I guided them through the process of installing the webcam extension and modeled how to record an effective intro (speak loudly with enthusiasm while stating your names and your topic). After the students had recorded themselves, we uploaded the pictures we had saved and dragged them into the movie timeline. The students planned what they would say about each image, but before they recorded their voiceover, they chose their Theme by clicking the magic wand icon. I found that it is helpful to choose the theme before recording the voiceover because the theme sometimes changes the duration of the video. Just be sure to mute the audio while recording the voiceover so it’s not playing while you are recording. The students recorded their voiceovers, providing facts about each picture. Finally we published our videos and shared the links on Schoology. You can see them all here.