Category: 2nd Grade

2nd Grade Matter Comics

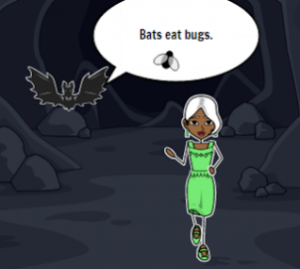
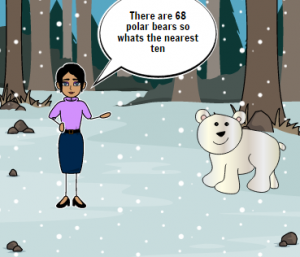
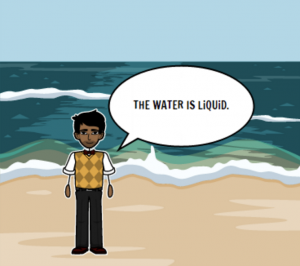
Second graders at Laburnum Elementary have been learning about the states of matter (SOL2.3), so today students in Ms. MacKenzie’s class created states of matter comics using StoryboardThat. First we reviewed different types of solids, liquids, and gases so everyone wasn’t doing the same ones. I’ve found that students are very creative when it comes to solids, but they need a little help thinking of different liquids and gases. I pointed out that anything that flows is a liquid: lava, honey, ketchup, even applesauce. For gases, we talked about the sun and the gas giants, as well as helium, oxygen, hydrogen, and more. Then we used the three-panel comic on StoryboardThat to illustrate the three types of matter. We clicked and dragged background scenes to each panel, then we added characters. I showed them how to use the “Edit Pose” button to change their poses and facial expressions. Finally we added the speech bubbles (textables) and typed a sentence in each one describing the state of matter shown. We used the snipping tool to take a screenshot of our finished comics and posted them on Google classroom. You can see them all here.


2nd Grade Magnet Animations

Second graders at Laburnum Elementary have been learning about magnets and how opposite poles attract and like poles repel (SOL2.2). Today students in Ms. Jones’ class created magnet animations using ABCYa!Animate. First I explained how animation works (it’s a series of still pictures that are viewed rapidly so it looks like objects in the pictures are moving). I also explained that their animations would show magnets attracting to and repelling from each other. Most students chose to draw bar magnets, but they could also have drawn horseshoe magnets. They knew to paint the north pole red, and the south pole could be any color (traditionally, it is blue or grey). We used the “Text” tool to add an “N” and an “S” at the respective poles. After they drew their first magnet, we grouped it together so we could move it as one object. Then they drew their second magnet with the opposite pole facing the first one. We grouped that one together as well. Next we used the “Copy Frame” button to copy our picture and move the magnets a little closer to each other. We also typed the word “Attract.” We continued copying the frames and moving the magnets closer to each other until the opposite poles touched. Now it was time to show “Repel.” I taught them how to flip the magnet around so like poles were facing each other (put the cursor in the corner of the magnet and click and drag the curly arrow that appears). We typed “Repel,” and copied the frames, moving the magnets further apart in each frame. Finally clicked the “Loop” button so the animation played over and over, then we exported it as a GIF. We shared our animations on Google classroom, but you can see them all here. (UPDATE: I taught a similar lesson with Ms. Ernst’s class and posted them to a Padlet).


2nd Grade 2-digit Addition or Subtraction

Second graders at Trevvett Elementary have been learning how to add and subtract two-digit numbers (SOL2.6 & 2.7), so today students in Ms. Golden’s class used Sketchtoy to animate the steps. SketchToy is a cool website that replays anything you draw. The students could choose to show the steps in solving a 2-digit addition or subtraction problem. I encouraged them to use different colors for the ones and tens. When they finished, they clicked “Save” and pasted the link to Google classroom so they could watch each others’ animations. It’s great for teachers because they can observe the process the students’ go through to solve the problems. Plus, they can speed it up, slow it down, or pause it as they watch the replay (using the play bar at the bottom). The students really enjoy how you can also add different vibrations to the sketch. After the students solved their math problems, I wanted to show them different ways to use SketchToy, so we used it to illustrate a plant growing and a frog life cycle (SOL2.4a,b). You can see all their drawings here.


2nd Grade Habitats & American Indians Comics

Second graders at Laburnum Elementary have been learning about animal habitats in Science (SOL2.5b) and American Indian tribes in Social Studies (SOL2.2). Today they could chose an animal or one of the three tribes (Powhatan, Lakota, and Pueblo) and create a comic with three facts. We used StoryboardThat to create the comic. First we added the background scenes. There were pictures of almost every kind of habitat for the animals, as well as pictures that look like the Eastern Woodlands, Great Plains, and southwestern desert for the tribes. I showed how they could click “Edit Scene” to change the weather in the picture. Next we clicked the “Characters” tab at the top and clicked “1600s to 1800s” for pictures of the American Indians or the “Animals” tab to find pictures of the animals they needed. The characters also have an “Edit Pose” button that allows the students to customize their poses and expressions. Finally we clicked the “Textables” tab at the top and added speech bubbles. In each speech bubble the students wrote a complete sentence with one fact (such as the animal’s habitat or the Indian’s home). We posted them to Google classroom, but you can see them all here.


2nd Grade Lakota Indians

Second graders at Trevvett Elementary have been learning about three different Indian groups: the Powhatan, Lakota, and Pueublo (SOL2.2). Today students in Mr. Weldon’s class used ABCYa! StoryMaker to draw and write about the Lakota Indians (the tribe they are currently studying). As we were navigating to the website, we discussed their background knowledge of the Lakota–where they lived, what they hunted, their transportation and occupations, as well as how they dressed and built their houses. With StoryMaker, there is a drawing part (blue button) and a writing part (yellow button). First we painted a picture of the Lakota Indians, including their environment, homes, and animals. Next we typed complete sentences (SOL2.13a) about the Indians, using the vocabulary words we have learned. When we were finished, we clicked the Print button and saved it as a PDF. Then we uploaded it to a Padlet that you can see here. Sharing the students’ written work online via Padlet (or any other webtool) is one of the advantages digital assignments have over traditional written assignments. Students and parents have access to their work from anywhere, and they can review it anytime they want. Plus, students are getting valuable practice with word processing and other computer skills.


2nd Grade Egypt Comics

CaptureSecond graders at Holladay Elementary are learning about ancient Egypt and its contributions (SOL2.1) so today students in Ms. Brown’s class created comics about ancient Egypt using StoryboardThat. I posted a link to StoryboardThat on Google Classroom so the students could access it easily, and once we arrived at the site, we clicked “Create a Storyboard.” To find backgrounds that relate to ancient Egypt, we clicked the “Historical” tab and scrolled to the end. There are also ancient Egyptian characters under the “Classical Era” tab. I showed the students how to customize the characters’ skin, eyes, hair, clothing, and poses. Then we added “Textables,” or speech bubbles, and the students typed complete sentences with facts about ancient Egypt. I put a word bank on the board to help with spelling: pharaoh, hieroglyphics, pyramid, Nile, papyrus, mummy, etc. Since you have to be 13 to have an account and save your comics on StoryboardThat, we saved our work by taking a screenshot of it (Dell Start icon > Snipping tool). Finally we uploaded our comics to Google classroom and posted a question for our classmates to answer. You can see some student samples here.


2nd Grade Menus

CaptureMs. Jefferson at Davis Elementary emailed me with a project idea she had for her class: “I would like for the kids to create menus. One of our language arts sols includes real world reading, so on Wednesday the kids will start creating menus for a pretend restaurant. We will also include math by using prices for items written correctly using the dollar sign and decimal point or the cent sign. When you come on Thursday, the kids should be ready to use their drafts to create on the computer.” This was a great idea, and I really like how it included elements of both language arts and math. I created a simple Google slides brochure template with a line down the middle of the slide for the menu fold. I gave a copy to each student on Google classroom, but only one student in each group opened the slideshow so they could all be on the same document. First I showed them how to add a Background image. I explained that the image shouldn’t be too distracting from the text. Food closeup photos work well, but images with lots of different types of food are distracting. Next the students added a title with the name of their restaurant and a subtitle with their names or a description of their cuisine. Davis is a multicultural school, so there were many ethnic restaurants. The second slide was the inside of the menu, so I showed the students how to add a table for the foods and the prices. They also added some images of the dishes they served. Finally, we published our menus to the web (File > Publish to the web) and pasted the links to Google classroom. You can see them all here.


2nd Grade American Indian Maps

CaptureSecond graders at Laburnum Elementary have been studying the American Indians (SOL2.2) and map skills (SOL2.4), so today students in Ms. Satterfield’s class created American Indian maps. I posted a link to My Google Maps on Google classroom and pointed out that students can always get back to any maps they create by using that link. On the website, we clicked the red “Create new map” button and titled it “Indian Map.” I explained that they would watch me make a marker first, then we would make one together, and finally, they would create some by themselves. First I made a sample marker on Laburnum Elementary to show them how to add a marker, change the color and style of the marker, and add text and images. Next each student clicked the marker button on their own map and placed a marker where the Powhatan Indians lived in Virginia. We titled it “Eastern Woodlands” and wrote a complete sentence about the Powhatan Indians. After pressing the blue “Save” button, we clicked the camera button to add a photo. Since typing the name of the tribe didn’t usually provide good results, I suggested that they could search for the environment (woodlands), homes (long houses), animals (deer), modes of transportation (canoe), etc. Then I showed them how to customize the marker icon using the paint bucket button. Now it was up to them to create markers showing where the Lakota and Pueblo Indians lived. I wrote a word bank on the board for them to use (Great Plains, Southwest Desert, buffalo, bison, teepees, tipis, adobe, multi-story terraced buildings, etc). When the students were finished with their maps, we clicked the “Share” button and changed the privacy to “Anyone with the link.” We copied the link to our map and posted it on Google classroom for our classmates to see. You can see them here.


2nd Grade U.S. Geography Maps

CaptureSecond graders at Davis Elementary are learning about map skills and United States geography (SOL2.5). Today students in Ms. McGovern’s class created their own customized Google maps showing the important features like the Great Lakes, the Mississippi River, and the Rocky Mountains. First I posted a link to My Google Maps on Google classroom. The students clicked “Create a new map” and titled it “United States.” Then I showed them how to add markers and customize the color and shape of the markers using the paint button. They placed markers on a few places and labeled them. I also showed them how to click the camera button to add photos of each place. They used Google image searches to find pictures they liked. Next I showed them how to use the line tool to draw the rivers (Mississippi and Rio Grande), and they customized the color and width of the lines. Finally, we shared our maps to anyone with the link and posted them to Google classroom. You can see them all here.


2nd Grade Rounding with Habitats

CaptureSecond graders at Holladay Elementary are learning how to round to the nearest ten in math (SOL2.1b) and they are studying habitats in science (SOL2.5), so today students in Ms. Edmonds’ class created comics about rounding numbers in habitats. First, I posted a link to StoryboardThat on Google classroom. StoryboardThat is an amazing webtool that students can use to create their own comics. I introduced the lesson by explaining that scientists often count living and nonliving things in a habitat, but since they can’t count every single one, they usually round the numbers. I instructed the students to choose a habitat they were curious about (desert, forest, ocean, etc) and think about the living and nonliving things in that habitat. They could do some quick research online if necessary. When the students had their ideas, they clicked the Storyboard link and were given a blank comic strip with three boxes. I explained that they would put living things (plants and animals) from the habitat in two boxes and nonliving things (rocks, shells, etc) in the other box. They dragged in backgrounds, characters, and clip art into each scene. They enjoyed changing the facial expressions and poses of the characters. Then we added speech bubbles for the characters to say how many of each living and nonliving thing there were in the habitat. We took a screenshot of our comics and posted them to Google classroom with a question about rounding the animals, plants, or nonliving things in the habitat. Our classmates tried rounding the numbers in our comics to the nearest ten, and they posted their answers in the comments. You can try them yourself here.