Category: Language Arts

2nd Grade U.S. Symbols Place Value

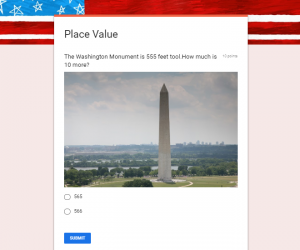
Second graders at Holladay Elementary have been learning about the U.S. symbols in History (SOL2.13) and how to calculate 10 or 100 more or less in Math (SOL2.1b). Today, students in Ms. Edmonds class created Google forms to review these concepts. First, each student chose a U.S. symbol to research (bald eagle, flag, Washington Monument, or the Statue of Liberty). They could use the Internet or books, and I instructed them to find a number related to their symbol. Some examples would be finding the height or weight of their symbol or identifying the number of objects on their symbol (stars, stripes, steps, etc.). Next, we went to our Google Drive and opened a New > Google Form. The students added a title, like, “Place Value.” Then they typed a problem to solve involving their symbol’s number and calculating 10 or 100 more or less. For the answer choices, they typed the right one and a few wrong ones. We discussed how to make the wrong choices tricky by thinking about common mistakes. If your question asks for 10 more, one of the wrong choices could be 10 less. I showed the students how to add an image of their symbol using the built-in Google image search. Finally, we went into settings and changed the form into a quiz, marked the correct answer, and shared the link on Schoology so our classmates could solve our problem. You can take a look at some student samples here.


5th Grade Oceans Websites

Fifth graders at Trevvett Elementary have been studying the characteristics of ocean environments (SOL5.6), so today, students in Ms. Poland’s class created their own oceans websites using Google sites. First, the students accessed their Google Drive and clicked New > More > Google Sites. This opened up a starter template. They typed a creative title (with capitals), selected a background header image, and a theme. Next the students chose a layout and began typing the information they wanted to share. Some wrote about ocean life, others wrote about the ocean zones, and a few wrote about ocean topics that weren’t necessarily taught in class, but were interests of theirs. I usually guide students to write before searching for images, because the image search can become distracting and time consuming. However, I also understand that images can inspire further writing. So once the students had some focused typing time (ten minutes or so), I let them search for photos, even if they weren’t finished writing. After they added their photos, they went back and revised their writing until it was polished and complete. Finally, I showed them how to publish their webpages, copy the links, and share them on Schoology for their classmates to see. You can take a look at some of their work here (UPDATE: I taught this lesson in a few other classes and added their examples to the document).


5th Grade Henrico Election Posters

Fifth graders at Trevvett Elementary have been learning about Henrico county government (HC.2) in Social Studies, and they’ve been identifying the main idea and summarizing nonfiction text in Language Arts (SOL5.6d,e). Since elections are coming up in November, students in Ms. Harris’s class and Ms. Brown’s class conducted research to find information about the candidates running for office in Henrico County. Then we summarized our findings to create campaign posters. First, we used this site to see the list of candidates. Each student chose a candidate they weren’t familiar with since many of them already had a family favorite, and I wanted them to be exposed to different viewpoints. Next, they did a Google search for their candidate and explored their campaign website. I showed them where to look to find the “Beliefs” or “Issues” sections. After the students read some of their viewspoints, we discussed ways to summarize their views into a couple of sentences for the campaign poster. Students could use Google Docs, Google Slides, or Google Drawings (as well as other tools like DesignCap) to make posters, but we chose to use Google Drawings since we hadn’t used that tool yet. For the poster’s background, we added a square shape, made it as large as the poster, and changed the fill color so it was a solid color or gradient. Then we clicked “Insert > Word Art” and typed the candidate’s name. I showed them how to change the font, fill, and outline color of the text. We imported a photo of the candidate using the Google image search feature. Finally, we added a speech bubble with the Shapes button and typed a summary of the candidate’s beliefs. We shared our campaign posters on Schoology, but you can see them all here.


4th Grade Virginia Math Quizzes

Fourth graders at Varina Elementary have been learning about Virginia geography in Social Studies (VS.2) and rounding and place value in Math (SOL4.1). Today, students in Ms. Stevens’ class synthesized these concepts, along with research skills, to create Virginia Math quizzes using Google forms. First, I explained that we would be creating 1-question quizzes, but when we took each others’ quizzes, we would end up answering several questions. So their job was to create a really good question about place value or rounding that would make their classmates think. We reviewed types of questions they could ask: What is the value of the digit __? What number is in the __ place? How would you write this number in word form? What is this number rounded to the nearest ten thousand? Next, they had to do research to find a fairly large Virginia number. I showed them how they could use the microphone tool to audibly ask Google a question like: What is the population of Richmond? How tall is the tallest mountain in Virginia? How many chickens live in Virginia? How far is it from Roanoke to Arlington? How long is the James River? Once they had their number and a math question, we opened a blank Google form (New > More > Google Form), and they typed their question. I pointed out that their multiple choice answers should be tricky, based on errors that students typically make. For students who finished early, I showed them how they could change the theme of the form and add images. To turn their regular Google forms into self-grading quizzes, I demonstrated how to go to the gear icon at the top, click the Quizzes tab in the pop-up window, and change it to a quiz. Then, they had to mark the correct answer to their question. Finally, we shared the links to our forms on Schoology, and took each others’ quizzes. You can see them all here.


2nd Grade “Mystery Me” Introductions

Second graders at Laburnum Elementary got to know each other better today with a fun “Mystery Me” activity. First, they went to Pixect and took a photo of themselves. Pixect is a great tool for taking quick webcam photos. It has an array of filters and timers available to use, but we just saved the photo and uploaded it to FacePixelizer, where the real magic happens. FacePixelizer is another great tool with many instructional uses. We used it today to pixelate our faces, but it can be used to make anything in a photo unidentifiable and mysterious: pixelate a book title, a weather instrument, or an animal, and students can try to guess what it is from various clues. It’s simple to use. Just click and drag across the area you want to pixelate. The amount of pixelation can be adjusted with a slider. Once we pixelated our faces, we downloaded the images and added them to a Google slideshow template that I gave them. The first slide was titled “Who Am I?” with two sentence starters: “I like…” and “I have….” The students completed the sentences with clues about themselves. On the next page they typed “I’m (Name)” and uploaded their original photo from Pixect. When they were finished, I combined all their slideshows together and added a Dissolve transition between them, so the pixelated photo gradually revealed the mystery student. You can see a few student samples here.


5th Grade Memory Walls

Fifth graders in Ms. Haislip’s class had a great year this year and wanted to remember it by creating a memory wall. There are numerous web tools you could use for a project like this, but today we used DesignCap. It’s a free resource that doesn’t require a sign-in, so it’s quick and easy to use, plus, it has many great features that I’ll describe below. In preparation for this project, Ms. Haislip uploaded photos from the school year to a Google folder and shared the link with her students on Schoology. Each student downloaded the pictures they wanted to use, then uploaded them to DesignCap using the Photo > Add Photo link. Next, they dragged the photos to the poster, rotating and resizing them until they were arranged the way they wanted. We used the Background tool to design a colorful background with gradients, and I showed them how to use the Text tool to add a title and captions to each photo. The text tool on DesignCap is quite robust, providing options for font, fill color, outline color, glow color, and transparency! The students practiced typing complete sentences with correct capitalization and punctuation for their photo captions (which is still a challenge, even for fifth graders). When we were finished, we clicked the Save button and selected the medium size. DesignCap projects can be saved in a variety of sizes up to the very generous XLarge size of 2478 x 3506 pixels. Finally, we uploaded our files to Schoology so we could enjoy viewing each others’ memory walls. You can take a look at them all here.


1st Grade Plant Sentences

First graders at Holladay have been learning about plants and their needs (SOL1.4). They have also been learning how to write complete sentences starting with capital letters (SOL1.13d,e). Today students in Ms. D’Antonio’s class used ABCYa! StoryMaker to create drawings of plants and write a sentence about plant needs. First, we reviewed the things that most plants need to live: sunlight, water, and soil. Then, we went to StoryMaker, and I showed them how to use the different brush tools to draw a picture of a plant. I suggested that they also include the things that their plant needs. Some students even knew that sunlight + rain make a rainbow, so they used the rainbow brush to add a rainbow to their picture. Next, we clicked the yellow button on the side to go to the writing section. Storymaker has the familiar lined paper and a font that early elementary students can read easily. I showed the students how to use Shift to make a capital letter and how to use the space bar to make spaces between each word. We started our sentences the same way: “A plant needs…,” then they chose the ending and added a period. You can see their plant drawings and sentences here.


5th Grade Sound eBook

Fifth graders at Trevvett Elementary have been learning about sound (SOL5.2), so today students in Ms. Capano’s class created sound eBooks. I explained that an eBook can do things that a regular book can’t do. It can have videos, animations, and sounds, which make it perfect for a sound book. First, Ms. Capano set up a class in BookCreator, and her students joined with a code. Then we created a new book. I asked them all to choose the square shape, so when we combined the books together at the end, they would all match in size. For the cover, I showed them how to change the color, add a title, pick a font, and search the web for a photo of sound. Inside the book, I instructed them to write complete sentences about sound. If they used a vocabulary word, like frequency or amplitude, then they could make it bold. They could also add photos of objects that make sound or draw sound waves with the pen tool. When they finished their pages, I showed them how to search for and download sounds on SoundBible. Then we uploaded our sounds to our books by clicking the + button and choosing Import > Files. Now we have a book about sound that actually has sounds in it! I combined all their books together into one class book. You can read their book here. (UPDATE: I taught a similar lesson on 3/20 with Ms. DiMatteo’s class at Holladay, and you can read their book here).


Tags:


2nd Grade Probability Book

Second graders at Holladay Elementary have been learning about probability (SOL2.18) and predicting whether an outcome is likely or unlikely. Today, students in Ms. Edmonds’ class created a Probability Book with BookCreator. After reviewing several examples of probability, we logged into BookCreator with the teacher code and created a new book. On the first page the students added a text box and typed “Probability.” Then they added a photo of themselves using the built-in webcam feature. I also showed them how to change the background color. On the next page, they drew a group of different colored objects and typed a sentence like, “What is the probability of picking a yellow ___ ?” Finally, on the last page, they typed the answer (LIKELY or UNLIKELY) and added a photograph from the Internet. This gave them practice using the three different ways to get images in BookCreator (using the webcam, drawing, or uploading a photo). Once all their pages were finished, I combined them into one book and published the link on Schoology. Now, as they read their class book, they are reviewing probability and its terms in a fun way! You can read their book here.


Tags:


Kindergarten Presidential Portraits

Kindergarten students at Trevvett Elementary have been learning about Presidents Day and the two presidents it honors: George Washington and Abraham Lincoln. Today, students in Ms. Gouldman’s class painted presidential portraits based on research. Yes, even kindergarten students can start learning how to do research. I explained that we wanted our portraits to look like the real presidents, so we had to find out what color their skin, eyes, and hair were. First I asked them to guess, then we looked online for portraits and photographs to confirm or revise our initial thoughts. It was difficult, though, to tell some of the colors from just paintings or black and white photos, so I showed them how to ask Google a question with the microphone button. “What color were George Washington’s eyes?” I asked, and the answer came back: blue grey. Then the students tried it with Abraham Lincoln. We discovered that his eyes were green or grey or hazel (that type of eye color fluctuates depending on the light). We already knew that Abraham Lincoln sported a beard, but we learned that George Washington had light brown or reddish hair, and powdered it so it appeared white (it was a military thing, like a modern day buzz cut). As we looked at the different websites in our research, I explained that some sites are reliable, and some are not. I pointed out that anyone can make a website, in fact, they will be making a sort-of website today, actually. Our website won’t be reliable since we are not professionals, but websites like encyclopedias or museums or scientific organizations are usually reliable, especially when they agree with each other. Now that we had our facts, we went to ABCYa! Storymaker to paint our portraits. The students had already practiced drawing on the computer this year, so that part didn’t take too long. It was a perfect time to teach some typing skills. Storymaker makes typing seem easy and familiar by including elementary lined paper (press the yellow button on the right). I showed the students how to use Shift to make an uppercase letter, and we typed the presidents’ first names. Finally, we exported our pictures and shared them on a Padlet, which is their own “sort-of” website that Ms. Gouldman can send home to parents.