Tag: imovie

1st Grade Telling Time iMovies

1stTime
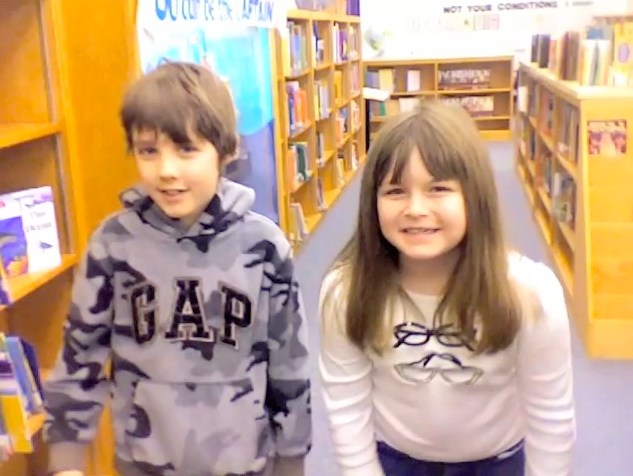
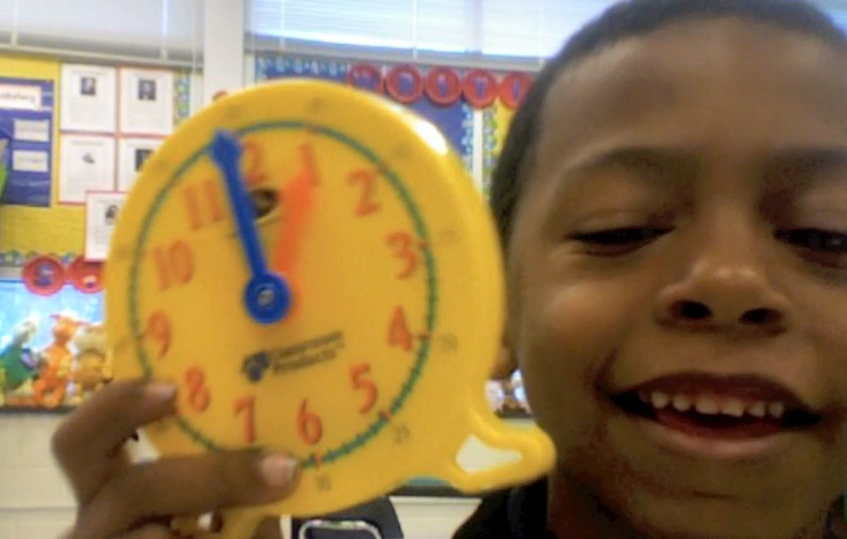
First graders in Ms. Reese’s class at Laburnum Elementary have been learning how to tell time to the half hour (SOL1.8), and today they used Photo Booth iMovie to create their own videos about time. First we reviewed how to tell time using the model clocks. Then we discussed what students are doing at different times throughout the day because I wanted them to not just tell the time on their clocks, but to also tell what they do at those times. Next we opened up Photo Booth, and I explained how it reverses the image so it will be kind of tricky to tell the time (although Samontey could tell time in the reverse as well!). They recorded themselves holding up the clocks, telling the time, and explaining their activities. This was a great way to assess understanding since we found out that although many students could tell the time, several had difficulty knowing what they do at those times. After that, we imported the videos into iMovie. I showed them how to add titles and music to their video. They loved that part! Finally we exported the videos as QuickTime movies. Take a look at a few student examples: Jarrett, Jakirra, and Noah (he can do a LOT at 9:00!).


3rd Grade Library Project

libraryToday I worked with small groups of third graders at Holladay Elementary to create videos for a contest. The theme was “The Library is the Heart of the School.” The students had to extend that analogy and think of creative ways to express it. I was really impressed with the ideas they came up with. Like Jacob thought of this excellent analogy: “The library pumps in people and the hallways are like the veins. Then it pumps out people with books. The people with the books are like the clean blood and the people with no books are like the dirty blood.” Some of the students gave a walking tour of the four parts of the library, comparing it to the four chambers of the heart. Others pointed out that the heart is often considered the place of emotions, and the books in the library make you feel all kinds of emotions like happiness, sadness, and fear. The students used Photo Booth to film themselves and iMovie to edit the videos. Some of them also added Keynote slides. Their projects turned out great! Take a look at them here: Group 1 and Group 2.


5th Grade Spheres of the Earth

Screen shot 2013-11-22 at 4.20.07 PMToday 5th graders in Ms. Hall’s class at Laburnum Elementary used iMovie to make videos about the spheres of the earth: the lithosphere, the biosphere, the hydrosphere, and the atmosphere. First they went online to gather images of each sphere. They saved them to their folders and then imported them into iMovie. I showed them how to arrange the photos, crop them, and adjust them in the timeline. I also showed them how to record a video introduction and a voiceover for the photos. Next we added subtitles to identify the different spheres. Finally the students selected a song from iMovie’s soundtrack library to play during their video. It was a lot to do this early in the school year, but her students did a great job. Take a look at a student example here.


2nd Grade Famous Americans iMovies

Screen shot 2013-08-07 at 1.49.26 PMiMovie is one of the more complicated programs on the MacBook computers, so I usually save that one for later in the school year. I’ve been working a lot with the second graders at Laburnum Elementary, and they have showed me they were ready to try iMovie. Since they’ve been reviewing the famous Americans (SOL 2.11) for upcoming tests, we decided to create movies about the famous Americans that they (and other classes) could use for review. Each child selected a person they were interested in and did a bit of research to refresh their memories. I showed them how to open up iMovie and add a title screen. Next they recorded themselves introducing the person using the built in video camera. I taught them how to select the part of the video they wanted to use and drag it up into their project. Then we did a Google Image Search for pictures of their famous person and added those to the video. I explained how to adjust the Ken Burns effect if necessary and they recorded a voiceover narration to accompany the photos. Finally I showed them how to add music to their video using the Audio Inspector. We exported the finished videos, and I posted them to a Google Doc which you can see by clicking here.


Kindergarten Spring Video

Picture 1Kindergarten students in Ms. Brown’s class at Holladay Elementary have been learning about the spring and how it affects the weather, plants, and animals. So today I showed them how to create a movie about Spring using iMovie. First we opened up iMovie and they recorded themselves saying something like, “Hi, my name is Whatever, and I’m going to tell you all about spring.” I showed them how to highlight the good part of their video and drag it into the project (that is always the most difficult part of iMovie for students to understand). Next we generated a list of search terms for finding spring pictures. They came up with words like sun, flower, chick, duckling, lamb, rain, butterfly, etc. They selected one word they wanted and I showed them how to do a Google Image Search. I thought they would be able to drag the picture right into iMovie, but since they couldn’t, I had to help with that part. (I discovered that feature is in a later version of iMovie so I had to drag the picture into a folder and then drag it into iMovie). Then I showed them how to record a voiceover telling about the picture. Finally they exported their videos as QuickTime movies (yep, they did it all by themselves!). Later, I combined all their videos into one movie and added a soundtrack. You can see it here.


4th Grade Jamestown iMovies

Picture 4Fourth graders in Ms. Hall’s class at Laburnum Elementary recently took a field trip to Jamestown. Today she wanted to see how much they had learned there, and she also wanted them to practice using iMovie. I explained that our iMovie project would need to be completed within the one hour class period since iMovie projects cannot be saved to the student folders (if you want them to keep working on them, they have to get the same computer that they started with since the projects are saved to the hard drive). I explained that we didn’t expect perfect videos due to the time restraints, but I wanted them to learn as much as they could about the features of iMovie. First, in order to show them how iMovie can use both pictures and video, we did a Google image search to find pictures of Jamestown. I pointed out that they could search for other topics besides just “Jamestown.” They could search for important people, events, and resources as well. Once the students found four or five good pictures, they dragged them into their folders and imported them into iMovie (you can’t drag pictures directly from the Internet into iMovie). I also showed them how to adjust the Ken Burns effect using the cropping tool since some parts of their pictures were cut off. Next we added text to each picture and recorded a voiceover with additional details. I think their favorite part was adding the music soundtrack. A nice feature of iMovie is that it automatically lowers the volume of the soundtrack during the voiceover, but I also showed them how they could adjust it manually. Finally we added video at the end using the built-in webcam. We exported their projects as QuickTime videos and saved them to their folders. Now that they are familiar with the most important features of iMovie, they will be able to continue using it for future projects. You can see a student sample by clicking here.


Kindergarten Seasons Movie

Today kindergarten students in Ms. Brown’s class at Holladay Elementary created a movie about the seasons. First we talked about science shows and how the speakers talk clearly with expression. We also reviewed the facts they had learned about the different seasons including how their clothing and activities change as well as how animals and plants change. The students worked in partners and planned what they wanted to say in general, but we didn’t ask them to write a script because we wanted them to be creative and ad lib. Sometimes having a script with young readers is too distracting for them. When it came time to film, the students used Photo Booth and used custom backgrounds of the different seasons that you can download by clicking here. Each pair spoke about all four seasons, then I took clips from each pair’s video and combined them into a whole class movie. I added a soundtrack, “PB&J” by Kerry Muzzy, and subtitles using iMovie. The students had a few problems with the Photo Booth backgrounds (as you can see in the bloopers), but overall they did an outstanding job. Take a look at their movie here.


4th Grade Sign of the Beaver Videos

One of the great things about the student laptops is that they all have a built in video camera with Photo Booth. So your students can use it to film anywhere… even outdoors. Today at Johnson Elementary, fourth graders were creating their own movie adaptation of The Sign of the Beaver book. Movie-making is an excellent way to review and check for comprehension of any book your students are reading. It also includes elements of research, collaboration, problem-solving, and creativity! For several days prior to filming, the students had worked in groups to develop their scripts and make their own props. Today was filming day, and I was in charge of holding the laptop/camera while they performed. It was quite entertaining! The students did an excellent job speaking with expression. After I shot the raw footage, the students were going to edit it using iMovie to add in the titles, music, and special effects. You can take a look at the raw footage here:
Group 1 – Scene 1, Scene 2, Scene 3, Bloopers
Group 2 – Scene 1, Scene 2, Scene 3, Scene 4


5th Grade Oceans Movies

Fifth grade students at Chamberlayne Elementary have been learning about the oceans and ocean ecosystems. One of their cumulating projects was to create a video about a sea animal that they studied. So after their research was done, they called me in to show them how to use iMovie to create their videos. I explained how to drag in the pictures they collected, how to adjust the Ken Burns pan and zoom effects, and how to add special sound effects via the Media Library. Before they did their voiceovers, we discussed the importance of speaking clearly with expression. Some of them chose to write out a script while others could recall the important facts with just a few notes. One of the problems with recording in a full classroom is the background noise, so I allowed students to record out in the hallway if they wished. When the videos were finished, we exported them so the teacher could publish them on her blog. You can see a couple of student samples here: Sharks and Sea Turtles.


Tags:


Kindergarten Thanksgiving Resources

Thanksgiving is fast approaching, and several kindergarten classes have been working on technology projects (K.1b). Today at Holladay, they put themselves back in time at the first Thanksgiving and set food on the table in Pixie. They also recorded their voices telling about their Thanksgiving traditions and what they are thankful for. Click to watch a few student samples: Cameron, Fatima, Jace. Next week at Johnson we will be working on Thanksgiving Past & Present using Comic Life and a folder of pictures that you can download by clicking here. You can actually use those photos for a variety of projects… use them as a background in Photobooth, create a Keynote, or make a Thanksgiving video in iMovie. Did you know the first official Thanksgiving was actually held right here in Virginia? I filmed a video for the Virginia Trekkers at Berkeley Plantation where you can find out all about it. I also included several kid-friendly links for your students to research Thanksgiving. Hope you enjoy your holiday next week!