Tag: coding

3rd Grade Moon Phases with Scratch

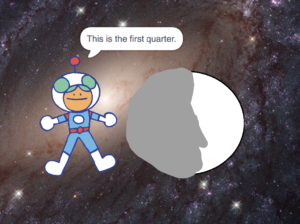
Third graders at Varina Elementary have been learning about the four major phases of the moon (SOL4.6c), so today students in Ms. Goode’s class used coding and Scratch to create a moon phases activity. First we reviewed the phases of the moon with PBSLearningMedia, NASA, EarthSpaceLab, Moon Phase Simulator, and we even got to see which phase of the moon is showing tonight in Richmond. Next, we logged into Scratch, and the students added a space background. Then I showed them how to add their own “sprite” as a drawing. We drew a circle shape for the moon and filled it in with the paint bucket. This would represent the full moon. Then we duplicated it three times and added shading to represent the first quarter, third quarter, and the new moon. In the code for the moon, we programmed it to switch costumes every three seconds. The last step was to add another “sprite,” or character and code it to say the correct phase every three seconds. We tested our programs to make sure they worked, then we published them and shared the links in Schoology. You can take a look at some of the projects here.


Tags:


5th Grade Coding Figurative Language

Fifth graders at Trevvett Elementary have been learning about figurative language (SOL5.4d) in English, so today students in Mr. Golden’s class used Scratch and coding to create interactive posters with figurative language. First, we reviewed different examples of figurative language: simile, metaphor, personification, hyperbole, and alliteration. Then we logged into Scratch, and the students chose a background and a character (sprite). They also created two buttons and wrote a type of figurative language on each. In the code for each button, they used the “Broadcast Message” block so that when the button is clicked, it would send a message to the character. Next, they created three costumes for their character. One costume would give the directions and the other costumes would give examples of figurative language that related to the character, background, and situation. Finally, the students added code to the character so that when it received a message from a buttons, it would say the correct thing. So if the user clicked “Metaphor,” it would give an example of a metaphor. You can try out some student examples here.


Tags:


2nd Time Activities with Wick

Second graders at Laburnum Elementary are learning how to tell time to the nearest five minutes (SOL2.9), so today students in Ms. Brouillard’s class created time activities with Wick. First, I showed the students a sample and explained that each button works with code. If you click the button with the correct time, the character turns happy, but if you click the button with the wrong time, the character turns sad. The Back button returns the character to its normal, beginning state. I explained that the students will be able to customize their own character, clock, and buttons. They could even customize the code, if they wanted. Wick is a powerful coding tool, and one thing I really appreciate is that it doesn’t require a login, which is very important for elementary students. Once they entered the website, I instructed the students to click the “Open” button in the top right corner and upload the template that I gave them. The template has a blank clock face, a simple character, a back button and two buttons with 0:00 on them for the two choices. The students used the drawing tools to draw hands on the clock, and I challenged them to pick a difficult time, instead of an easy one. Then they put the correct time on one button and an incorrect time on the other button. I explained that they should try to make the incorrect one “believable” by choosing a time that another student might guess, based on common mistakes (switching the hands, for instance). They could also move the buttons around and change their color by clicking on them. The students also double clicked the character to reveal three instances of it, and they used the drawing tools to make the first one look normal, the second one look excited and the third one look sad. Finally, they tested their projects to make sure they worked correctly and exported them as HTML files. I uploaded them to my website where you can see some student examples here.


Tags:


5th Grade Geometry with Scratch

Fifth graders at Trevvett Elementary have been studying angles (SOL5.12) and triangles (SOL5.13) in Math, so today students in Ms. Capano’s class created Scratch activities to review these concepts. First I showed them a sample using the new text-to-speech feature. I explained that there were several different voices they could choose from. Mine uses the Spanish female voice. I pointed out that they could click the “See Inside” button on my sample if they needed help with their code. Next the students logged into their Scratch accounts and chose a background and a sprite, or character. On the background, the students drew their angle or triangle with the drawing tools. They also used the drawing tools to create three costumes for the character: a neutral one for asking the question, an excited one for the right answer, and a sad one for the wrong answer. Then we started working on our code. I taught them how to turn on the text-to-speech feature by clicking the “Add Extension” button on the bottom left. The students added code to ask the user’s name and save it as a variable so they could include it in their responses. Variables are another concept fifth graders learn about in Math (SOL5.19). We also added an “If-Then” code so that if the answer was right, it would change costumes and give an excited response, but if it was wrong, the costume would change to the sad one and give an encouraging response to keep trying. You can take a look at some of their projects here. Be sure to turn up your volume because they do have voices!


Tags:


5th Grade Angles & Variables

Fifth graders at Laburnum Elementary have been studying angles (SOL5.12) and variables (SOL5.19), so today students in Ms. Burgess’s class used Scratch to review both of these concepts. First we signed into Scratch and clicked “Create” to start a new project. I showed them how to delete the cat and choose a new sprite, or character, from the library. Next, we clicked on the background tab, and I instructed them to draw an angle using the line tool. Our plan was for the character to ask a question about the angle, and if the answer is correct, the character will get happy, but if the answer is wrong, the character will be sad. I explained how to click the Costumes tab and design three costumes for their character: normal, happy, and sad. We also changed the names of each costume at the top so that we could identify them in our code. Now it was time for coding! We programmed the character to ask the user’s name, save their name in a variable, and use their name later in the responses. You can see some student projects here (and if you click “See Inside” you can look at the code they used).


Tags:


5th Grade Variables with Scratch

Fifth graders at Laburnum Elementary have been learning about variables in Math (SOL5.19). Today, students in Ms. Hall’s class used variables and code to create mini math games using Scratch. I started out explaining the idea behind the math game: a character would ask for the players’ name, it would calculate the number of letters in the name, then create a multiplication problem with that number and a random number between 1 and 12. The player would try to solve the problem, and the character would let them know if they were right or wrong. Students could use their own creativity to modify the game however they wished. First, we selected a background and a character (called a sprite) in Scratch. Then, we went into the sprite’s costumes and used the paint tools to make a happy costume for the correct answer and a sad costume for the wrong answer. Now it was time to build the code with variables. I pointed out that a variable is just something that can change. So the player’s name is a variable, the number of letters in the name is a variable, the random number is a variable, and the player’s answer to the multiplication problem is a variable. In Scratch, you define variables using a piece of code that basically says, “Set (variable) to (whatever you define it as).” The variables are displayed in the top corner of the game to keep track of them, but you can delete those if you want. After defining the variables, the students added some “if-then-else” code so that if the answer is correct it would display the happy costume, otherwise it would display the sad costume. The character could also make a statement, if they wished. Finally, we shared our links on Schoology and tested each others’ games. You can see all their Scratch creations here (just click on their names under each picture). Be sure to click the “See Inside” button to view their code.


5th Grade Southeast Region Facts & Opinions

Fifth graders at Trevvett Elementary have been learning about the southeast region of the United States in Social Studies and facts and opinions in Reading (SOL5.6i). Today, students in Ms. Brown’s class created an interactive webpage with facts and opinions about a southeastern state. We used a fantastic new site called Wick that teaches coding in a simple but powerful way. First, the students chose a state in the southeast region to research. As they gathered information, I instructed them to download a map of their state to use in their project. Next, we went to Wick and clicked “Launch Editor.” We uploaded our map, used the drawing tools to create a character, and added two buttons for “Fact” and “Opinion.” To make a button in Wick, we selected the shape(s) and chose the “button” tool. We also grouped our character together (by dragging across all the parts) and turned it into a button. One of the most powerful features of Wick is the ability to give each button its own timeline that can be triggered with code. So we added new frames to our character’s timeline (by clicking it twice and clicking the + in the timeline) and added a stop(); code to each frame using the Javascript “JS” button. Without the stop code, the timeline would play and loop automatically, which is great for animation, but not for our activity. We typed an opinion about our state in one frame and a fact about our state in the other frame. Then went back to the main page and added code to each button to go to the correct frame. For example, our code on the “Opinion” button would go to the 2nd frame of the character’s timeline:

function mouseDown() {
character.gotoAndStop(2);
}

You can see that it is real JavaScript, but the students don’t have to type it all. They click the code snippets from the left panel, and it fills in automatically. Finally, the students checked their code by pressing the “Run” button. If everything worked, we exported it as an HTML file. You can see all their webpages here.


Tags:


5th Grade Student-Created Review Activities

Fifth graders at Varina Elementary have been reviewing science SOLs for the year. Today, students in Ms. Messer’s and Mr. Williams’ classes used Wick to create interactive review questions. First, we brainstormed a list of topics they have studied this year: weather, rocks, cells, oceans, planets, sound, light, force, and elements. Next, students chose a topic and developed a good, thoughtful question with plausible answer choices. We went to Wick, added a background color, and typed our question and answers with the text tool. I showed them how to change the font, size, and color of the text using the toolbar on the right. We used the shapes tool to draw circles next to each answer choice and turned them into clickable buttons with the “Create Button” tool (pointing finger icon). Then, we used the paint tools to draw a character who would respond to the correct or incorrect answer. In order to create the code, the character had to be a named group, so we highlighted all its parts and clicked the “Group Objects” button. Beside “Name” in the Group tool bar, we gave it a name (like “boy” or “girl”). Then we double clicked the character and clicked the “Clone Frame” button to make two copies of it. Frame 2 represented the correct answer, so we gave our character a smile. Frame 3 represented the incorrect answer, so we gave our character a frown. Now we could add code to the buttons. Wick makes coding easy by including code snippets in the library. For the correct button, we used this code (changing the name boy to whatever the group was called):

function mousePressed() {
boy.gotoAndStop(2)
}

For the incorrect button, we used the same code, but just changed the code to gotoAndStop(3) so it went to Frame 3 of the character. We clicked “Run” to test our activity. If everything worked, we exported it as an HTML file and shared it on Schoology for our classmates to try. You can see all their questions here.


Tags:


2nd Grade Coding Magnets

Second graders at Holladay Elementary have been learning about magnets and magnetism (SOL2.2), so today, students in Ms. Edmonds’ class used Wick to code a magnets activity. First, I showed them a finished sample so they could see what they would be creating. Basically, they will have a person, a magnet, and two objects–one that’s magnetic and one that’s nonmagnetic. Then, they will use code to make the person smile when the user clicks on the magnetic object and frown when the user clicks on the nonmagnetic object. We reviewed different objects that were magnetic and nonmagnetic, then we got started. The students used the drawing tools to draw a person, a magnet, and two objects. I showed them how to change the objects into buttons (click the finger icon) and we added some code to the buttons. I like how Wick uses real code, but they keep it simple by including a code library that students can choose from. So instead of typing the code, they just click it. Our code for the buttons read: mousePressed gotoAndStop(2) for the magnetic object and mousePressed gotoAndStop(3) for the nonmagnetic object. Next, we duplicated Frame 1 (right click on it) and changed the face in Frame 2 to be smiling. We did the same thing for Frame 3, but changed the face to be frowning. Finally, we tested our code to be sure it worked and clicked File>Export HTML. That’s it! They just created their own interactive magnets website, which is really impressive for 2nd graders! You can see all of their activities here.


Tags:


3rd Grade Coding Money and Change

Third graders at Laburnum Elementary have been learning about money and counting change up to five dollars (SOL3.8). Today students in Ms. Hunt’s class used a new coding program called Wick to create an interactive math problem about making change. First, I showed them a couple of examples so they could get an idea of what we were going to do (here and here). I pointed out that their projects could look very different, but they had to have three things: (1) an object to buy with a price under $5; (2) a person with a $5 bill; (3) a right and a wrong answer. To get the students started, I created a template with some money files that you can download here. The students downloaded my template from Schoology, started a new project in Wick, and uploaded the template (File > Open). Now, in the Assets Library on the right, they had some money images to use if they wanted. They illustrated their problem with the drawing tools and typed out the question and answers with the text tool. We created two more frames by copying the first one (right click > Clone frame) and made a few changes to show the correct answer (the person gets the object and is happy) and the incorrect answer (the object leaves and the person is sad). Finally, we added the code to the buttons so that they go to the correct frame. One of the things I really like about Wick is that is uses real code. So we added a stop() code to each frame and programmed the buttons to go to the correct frames gotoAndStop(2) or (3). Wick exports projects as HTML files so they play in any browser. You can see all their projects here.


Tags: