Tag: animation

3rd Grade Animated Food Chain Relationships

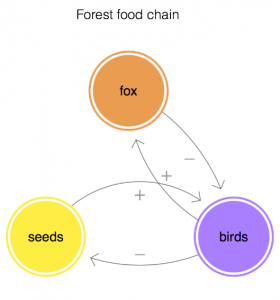
Third graders at Holladay have been learning about the relationships among organisms in aquatic and terrestrial food chains (SOL3.5), so today, students in Ms. Haley’s class created animations with Loopy to illustrate some of those relationships. First, we reviewed the different ecosystems: forest, desert, arctic, freshwater, ocean, etc. Then, students chose one ecosystem and typed the name of it in Loopy using the Text tool. Next, they used the pencil tool to draw a circle to represent a plant. If students didn’t know a plant that lived in their ecosystem, I showed them how to ask Google using the microphone. Next, students added an animal that eats that plant. Again, they could use Google for research. A great feature of Loopy is that it can show positive or negative relationships with arrows. We drew an arrow from the plant to the animal and discussed whether it should be positive or negative. It’s positive because more plants would mean more animals since they have a bigger food source. Then, we drew another arrow from the animal to the plant and made it negative (click the box in the upper right corner). It’s negative because more animals would mean less plants since they eat them. Students could continue adding animals to their web and using arrows to show the relationships between them. Finally, we pressed play and explored what happens when we change the population of each organism (by pressing the up or down arrows). We saved our animations as weblinks and shortened them with bitly. You can see them all here.


Kindergarten Life Cycle Animations

Kindergarten students at Trevvett Elementary have been learning about life cycles (SOLK.7c), so today, Ms. Gouldman’s class used ABCYa! Animate to create animations of the butterfly life cycle. First, we reviewed the stages a butterfly goes through–from egg, to larva, to chrysalis (metamorphosis), and to adult. Next, we went to ABCYa! Animate, and I showed them how to use the paint tools to draw some butterfly eggs in frame one. We looked at some pictures of butterfly eggs on the Internet so they could see the size and color of them. I pointed out that many butterfly eggs were laid on plants. Why do you think that is? Then, we went to frame two and drew the caterpillar. We looked at caterpillar images online to see the incredible variety in their colors and designs. We continued with the other stages, looking at photos of each stage, and then drawing our own creative ideas. When we were finished, we slowed down the animation using the frame rate button (bottom right), turned on looping so it repeated, and pressed play. The students were excited to see their butterfly move through each stage. Since it loops, it also shows how an adult lays more eggs and the life cycle repeats itself. Finally, we exported our animations as GIFs, and I uploaded them to a Lino page. Lino is similar to Padlet for sharing files, but since I’ve reached my limit on Padlet for the free account, I had to find something different. You can see all their animations here.


2nd Grade Animated Famous Americans

Second graders at Holladay Elementary have been learning about some of our famous Americans: George Washington, Abraham Lincoln, Helen Keller, Jackie Robinson, Martin Luther King, Jr., and Susan B. Anthony (SOL2.11). Today, students in Ms. Fournier’s class created animations of a famous American. First, they chose which person they wanted to animate and drew their face on ABCYa! Animate. We did some research online to make sure that we were drawing them correctly. We even asked Google about their hair color and eye color! Next, we used the copy cat button to make a copy of our picture and deleted the mouth. I showed them how to redraw the mouth in a new shape. We repeated the process for a few more pictures and changed the mouth into different shapes so it looked like the person was talking when we pressed the “Play” button. I explained that they could add additional realism by making the person blink or by making their ears and eyebrows move. When we were finished, we exported our animations as .gif files. Then, I showed them how to import their GIFs into WeVideo and add a voiceover to make it look like the person is talking. The voiceovers told about the famous American’s contributions and accomplishments. You can see their videos here. (UPDATE: Unfortunately, WeVideo recently changed their policy for free users so the video links expire after 90 days. However you can see another class’s animations without sound here).


1st & 2nd Grade Melting Matter

First graders at Holladay Elementary have been studying matter (SOL1.3), and they have learned that matter can be solid or liquid. Today, students in Ms. Milteer’s class created animations showing how a solid can turn into a liquid by melting. First, I showed them some time-lapse videos of various solids melting (ice cream, snowman, ice cube, butter, crayon, chocolate, candle). You may even want to record your own time lapse video of something melting. Many phones and tablets have a time lapse recording feature. Next, we went to ABCYa! Animate, and the students drew a solid object in the first frame. In the second frame, they drew the same object melted into a liquid. Then, we pressed play and slowed down the speed to watch our animations. Finally, we exported the projects as .gif files and shared them on Padlet). You can see them all here. UPDATE: Second graders learn about the states of matter as well (SOL2.3), so here are some student samples from a similar lesson I did with them using BrushNinja.


4th Electrical Circuit Animations

Fourth graders at Laburnum Elementary have been learning about electrical circuits (SOL4.3b), so today, students in Ms. Waltz’s class created animated circuit diagrams using ABCYa! Animate. First, we reviewed the parts of a simple electrical circuit and how the parts work–batteries, switches, and objects that turn on. We discussed a variety of electrical objects so everyone didn’t draw the same one (lights, radios, toys, televisions, computers, washing machines, ovens, robots, etc.). If your students need some extra help with circuits before doing this activity they can practice building their own here, here, here, or here. Next, we went to ABCYa! Animate, and I explained the process of creating the animation: (1) draw the complete circuit with an open switch in the first frame, (2) slowly close the switch in the next few frames, (3) show the flow of electricity however you like, (4) turn on your object in an interesting way. Finally we saved our animations as .gif files and shared them on Schoology. You can see them all here.


5th Grade Energy Animations

Fifth graders at Varina Elementary have been reviewing potential and kinetic energy (SOL4.2), so today, students in Ms. Primrose’s class created animations to illustrate these concepts. For this lesson, we used a different way to animate that I learned about from a fellow ITRT, Michael Price. He showed me how to create an auto-playing animation with Google slides. First, we reviewed potential and kinetic energy and brainstormed several examples (pulling back on a bow and arrow, squatting before a dive or a basketball throw, twisting a rubber band, squashing a spring, blowing up a balloon before releasing it, etc). I explained that we would be animating both the potential and kinetic energy of an action, so the students needed to choose one they found interesting. Next, we opened a blank Google slide, and clicked the Background button. The students used the built-in Google image search to look for a background that would fit their action. Then we added Shapes to make our characters and objects. We copied the slide (right click > Duplicate slide), and moved the shapes around slightly to make it look like the characters and objects were moving. We continued copying slides and making adjustments until our animations were complete. Now it was time to add the animation magic! We clicked File > Publish to the web and chose “Auto advance slides every second.” We also clicked the two boxes so that it would start automatically and repeat when it was finished. When the link appeared, we changed the number that came after “delayms=” to 100 to speed up the animation. You can see their final projects here.


5th Grade Physical & Chemical Changes

Fifth graders at Laburnum Elementary have been learning about how matter can change physically or chemically (SOL5.6), so today, students in Ms. Hall’s class created animations to illustrate some of these changes. First, we reviewed the differences between physical and chemical changes and looked at some examples. Then, the students chose a type of change they wanted to animate, and I explained how to download a suitable background image with a Google image search. Next, we went to ABCYa!Animate to create our animations. We clicked the “Edit Background” button and uploaded our background image. Then, we used the paint tools or the image library to create our first frame. I demonstrated how to copy the frame and make small changes in each subsequent frame so that when they press “Play,” it shows matter changing over time. When we were finished, we exported our animations as .gif files and shared them on Schoology. You can see them all here.


1st Grade Animated Services

First graders at Holladay Elementary have been learning about goods and services (SOL1.7), so today, students in Ms. Wimmer’s class created animated services with ABCYa! Animate. First, we discussed the differences between goods and services and identified various jobs that provide services (fireman, policeman, doctor, nurse, dentist, teacher, barber, plumber, etc). The students chose a service they wanted to animate, and we headed over to ABCYa! Animate to draw a picture of a big head. We wanted it to be big so we could show the mouth moving. I explained that they could add a hat to show the uniform, but I don’t think anyone did that. Next, we used the Copy Cat button to make a copy of the face. We deleted the mouth (with the X tool) and drew another mouth in a different shape to make it look like it was talking. I showed them various mouth shapes for making different sounds (Oh, EE, L, F, Th, etc). We noticed that in some mouth shapes you can see the teeth or tongue. After making a couple of additional copies of the face with different mouth shapes, we pressed the Loop button (so it repeated) and exported it as an animated GIF. Now it was time to add the voice. We used Vocaroo to make an mp3 recording of the students explaining the services. Then we posted our animations and recordings on a Padlet. I combined them all into a video that you can see here. Later, I realized it might be easier to upload the animated GIFs to WeVideo and record a voiceover there. I’ll try that in another lesson!


3rd Grade Famous Americans Come To Life!

Third graders at Varina Elementary have been learning about famous Americans (SOL3.11b George Washington; Thomas Jefferson; Abraham Lincoln; Rosa Parks; Thurgood Marshall; Martin Luther King, Jr.; and Cesar Chavez;). Today, students in Ms. Long’s class used SitePal to make them come to life. First, the students chose one of the famous Americans to represent, and we made sure that each person was picked by at least one student. Next, we did some quick research to find some facts and pictures of the person. I instructed the students to find a photo that showed their face up close so we could use it in the animation. We downloaded the image by right clicking it and selecting “Save image as.” Then, we went to SitePal and clicked the Demo button. We uploaded our image and followed the site’s instructions to add special markers to the eyes, nose, ears, mouth, and chin. Once that was done, the students were surprised to see the famous American blinking and looking around! To add the voice, students clicked the TTS (Text to Speech) tab and typed some sentences with good facts from their research. SitePal has customized male and female voices to choose from that read the text aloud. Finally, we used the Screencastify Chrome extension to record our animation. It’s amazing how realistic and life-like they look! You can see all the videos here.


4th Grade Moon Fractions

Fourth graders at Varina Elementary have been learning about the phases of the moon in Science (4.8c) and about fractions in Math (SOL4.2). Today students in Ms. Belcher’s class illustrated the fractional parts of the lunar cycle with ABCYa! Animate. First we divided the lunar cycle into eight parts and discussed the fraction representing each part. I pointed out that some of the fractions can be reduced, and they even provide names for some of the phases. For example, 2/8 of the cycle is called the first quarter because it is actually 1/4 of the way through. On each frame of their animations the students illustrated a different phase of the moon and wrote its corresponding fraction (new moon = 0/8, waxing crescent = 1/8, first quarter = 2/8 or 1/4, waxing gibbous = 3/8, full moon = 4/8 or 1/2, etc). We used the copy cat button to make sure that the moon stayed in the same place so that when the animation played, it would look like the phases of the moon were really happening. You can see them all here.