3rd Grade Moon Phases Animations

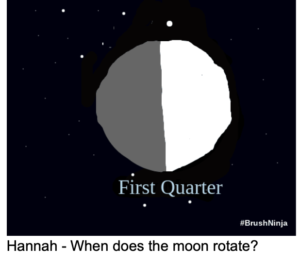
Third graders at Trevvett Elementary have been studying the movements and phases of the moon (SOL4.6c), so today students in Ms. Hufnell’s class used BrushNinja to create animations of the four main phases: new moon, first quarter, full moon, and last quarter. I started off by telling the students that today they will see a side of the moon they’ve never seen before, and they will get to actually look around the moon as if they were standing right there! First, to see the far side of the moon, we went to Google maps, clicked Satellite view (bottom left corner), turned on 3D (bottom right corner), and zoomed all the way out. When you zoom all the way out, you see the Earth, but over on the left side a panel should open up with the moon and planets. We clicked the moon and now we could click and drag it around to see the phases and the back side. Since the same side of the moon is always facing the Earth, this is a side we never see. We also looked at the top and bottom of the moon. Next, to look around on the surface of the moon we explored this panoramic photo from China’s Chang’e Lunar Mission. I asked the students if they knew what phase of the moon it was in right now. How could they find out? We went to NASA’s “Moon In Motion” website, which not only tells the current phase, but also has some great images, videos, and interactive diagrams. After reviewing the phases of the moon, we were ready to design our own moon phases animations. We went to BrushNinja and got a space background by clicking the background button at the bottom and either searching for a space background or choosing a solid black color and drawing small white dots for stars. Then we used the shapes tool to draw a grey circle for the moon. They could decorate it with craters, if they wanted. We also used the text tool to type “New Moon.” The students then duplicated this image three times (using the bottom button that looks like two sheets of paper), and used white paint to illustrate the different phases. For the full moon, I suggested that they make a new white circle the same size as the grey circle, instead of trying to fill it in with white paint. When they finished their animations, they exported them as GIF files and shared them on Schoology. In the comments, they typed questions about the moon for their classmates to answer. You can see their animations and questions here.


5th Grade Figurative Language & Force Animations

Fifth graders at Varina Elementary have been learning about figurative language (SOL5.4d) and force and motion (SOL5.3). Today, students in Ms. Messer’s class created animations with BrushNinja to illustrate different types of force and motion. Their animations showed pushing, pulling, speed, collisions, kinetic energy, and the effects of friction. They exported their creations as animated GIFs, then uploaded them to Schoology to share with their classmates. Along with their post, I encouraged them to type a sentence about their animation that included figurative language such as exaggeration (hyperbole), personification, similes, or metaphors. Later, I compiled their animations and sentences into a Google slideshow that you can see here.


Kindergarten Categorizing Matter by Weight

Kindergarteners at Holladay Elementary have been learning how to classify objects and represent data (SOLK.1c). They have also been studying the physical properties matter, such as the relative weights of objects (SOLK.3). Today, students in Ms. Whitfield’s class used ABCYa! Paint to group different objects by weight. First, I showed them how to use the paint brush tool to draw a line down the middle of their paper. Then they drew an “L” for “light” and an “H” for “heavy” on either side of the line. Clicking and dragging to draw and write is a challenging task for small kindergarten hands, but they did it! Next, I instructed them to click on the stickers and choose a few to drag onto their paper. We discussed the difference between real and imaginary objects. Since we can’t really weigh imaginary objects, we concluded that we should use stickers representing real objects for this activity. They put heavy objects on the “H” side (like trucks and big animals) and light objects on the “L” side (like foods and small animals). Finally, we saved our work by downloading it as an image file. You can see some student examples here.


1st Grade LogoMakr Templates

LogoMakr is a cool website for making logos. It has a great library of clip art and customizable text. But one of the things I like most about using LogoMakr in the classroom is you can design templates with it for your students to use. Just set up the page with the text and images you want, then save it, and send the link to students. They can change it up as much as they want, and when they save it, it gives them a new link, so your original template isn’t changed at all. For lower grades it’s especially great because it doesn’t ask them to sign in to use it. Here are two examples I used with first grade students at Laburnum Elementary today: In one class we made fractions (SOL1.4). The students changed the colors of the shapes in my template and typed the fractions in the text boxes. Then they made their own fraction with the shapes tool. In another class we created weather graphs (Math SOL1.12 & Science SOL1.7). The students dragged the weather symbols to make a pictograph, then they dragged the bars to make a bar graph. They also changed the colors of the bars. You are welcome to use these templates or adapt them as you wish. Try LogoMakr with your class!


3rd Grade Coin Calculator

Third graders at Laburnum Elementary have been learning about coins and money (SOL3.6), so today students in Ms. White’s class made coin calculators with Google Sheets. I gave them a template to get started (you can make a copy of it here). It has the header row already filled out. I showed the students how to change the font and color of the row by clicking the #1 on the left side and highlighting the whole row. Next we listed all the coins in column A: quarter, dime, nickel, penny. In column B they could type any number they wanted between 1-10 for the number of coins. In column C we wrote some code to calculate the value of that number of coins by multiplying the number in B with the decimal value of the coin. For example, the code for quarters is: =B2*0.25. So if there were 7 quarters, the code would solve 7 x 0.25 = $1.75. I showed them how to format Column C to display the numbers as currency (Format > Number > Currency). We typed code for each coin and tested it by typing different numbers in column B. The students were very excited to see their code actually working! Then we added an image of money and pressed the Chart button to make a bar graph of the number of coins. Finally we clicked the Share button and set it so anyone with the link could find it. We published our spreadsheets on Schoology, but you can see them all here.


5th Grade Vertebrates and Invertebrates Videos

Fifth graders at Holladay Elementary have been studying vertebrates and invertebrates in Science (SOL5.5), and they have been learning how to conduct research (SOL5.9), so today, students in Ms. Haislip’s class chose an animal to research and made movies about their animal using Adobe Spark. First, we brainstormed many different types of vertebrates and invertebrates, including insects and ocean creatures. Then I encouraged students go beyond the first few animals they recalled. I demonstrated how to use the internet to find unique animals that they had never heard of before. They could ask Google, “What are the most interesting animals?” or “What are the most poisonous animals?” or “What animals have superpowers?” After about five minutes of research, the students chose their animals and jotted down a few facts. They also downloaded one or two photos of their animal. Next, we went to Adobe Spark to start creating our videos. The students made a title screen and then recorded themselves introducing their animal. I explained that they need to speak with enthusiasm, like their favorite YouTuber. Then they added the photos and recorded a voiceover to give facts about their animal. Finally we added music, adjusted the volume so it wasn’t too loud, and published our videos. Students shared their videos with each other on Schoology, and you can see some of them here. (As you can see, they discovered some very unique creatures!)


Tags:


3rd Grade Making Change Comics

Third graders at Varina Elementary have been learning how to make change from $5.00 or less (SOL3.6c). Today, students in Ms. Hummel’s class created comics about different situations that involve making change. We used a great website for making comics called StoryboardThat. The comics had three panels: (1) in the first panel they had to tell how much the good or service cost, (2) in the second panel they had to tell how much money was paid, and (3) in the last panel they had to calculate the change that was given. StoryboardThat makes it easy to be creative because there are so many different backgrounds, and each character is completely customizable with different colors, facial expressions, and poses. We used the built-in, searchable clip art library to find additional objects for our comics like dollar bills and coins. Then students added speech bubbles (called textables) and practiced writing complete sentences with capitals and periods. They also learned how to add the $ dollar sign by pressing Shift and 4. Finally, we took screenshots of our comics and shared them on Schoology. You can see all their comics here. UPDATE: I’ve added additional comics from other classes to this document.


Tags:


5th Grade Variables with Scratch

Fifth graders at Laburnum Elementary have been learning about variables in Math (SOL5.19). Today, students in Ms. Hall’s class used variables and code to create mini math games using Scratch. I started out explaining the idea behind the math game: a character would ask for the players’ name, it would calculate the number of letters in the name, then create a multiplication problem with that number and a random number between 1 and 12. The player would try to solve the problem, and the character would let them know if they were right or wrong. Students could use their own creativity to modify the game however they wished. First, we selected a background and a character (called a sprite) in Scratch. Then, we went into the sprite’s costumes and used the paint tools to make a happy costume for the correct answer and a sad costume for the wrong answer. Now it was time to build the code with variables. I pointed out that a variable is just something that can change. So the player’s name is a variable, the number of letters in the name is a variable, the random number is a variable, and the player’s answer to the multiplication problem is a variable. In Scratch, you define variables using a piece of code that basically says, “Set (variable) to (whatever you define it as).” The variables are displayed in the top corner of the game to keep track of them, but you can delete those if you want. After defining the variables, the students added some “if-then-else” code so that if the answer is correct it would display the happy costume, otherwise it would display the sad costume. The character could also make a statement, if they wished. Finally, we shared our links on Schoology and tested each others’ games. You can see all their Scratch creations here (just click on their names under each picture). Be sure to click the “See Inside” button to view their code.


3rd Grade Famous Americans Elasped Time

Third graders at Trevvett Elementary have been reviewing famous Americans in Social Studies (SOL2.4) and learning about elapsed time in Math (SOL3.9b). So today students in Ms. Peay’s class created comics about famous Americans and the elapsed time of their well-known activities. First we talked about some possible activities and their duration. For example, how long would it take Cesar Chavez to work in the fields? How long would it take for Martin Luther King, Jr. to give a speech? How long would Rosa Parks ride in the bus? Then we discussed two different ways to ask about elapsed time: we could give the start and end times and ask about the duration, or we could give the start time and the duration, and ask about the end time. Once they planned out what they wanted to do, the students went to StoryboardThat, which is a great tool for making comics. They created comics with three panels. The first two panels had to give information about the person, their activity, and the times, while the last panel had to ask the reader a question about elapsed time. We posted our comics on Schoology, and our classmates had to reply with the answers to our questions. You can see some student samples and their comments here.


Tags:


3rd Mali Matter Comics

Third graders at Varina Elementary have been learning about the Empire of Mali in Social Studies (SOL3.4) and matter in Science (SOL3.3). So today students in Ms. Goode’s and Ms. Lanham’s classes created Mali Matter comics. First we reviewed different aspects of the Mali Empire: griots, camels, salt, gold, Timbuktu, the Niger River, etc. and categorized them as solids, liquids, or gasses. Since we didn’t identify too many gasses or liquids, the students had to be creative (and they were!). Now that they had some ideas for their comics, we went to StoryboardThat, which is an online tool for making comics. We made a 3-panel comic, and in each panel the students had to provide an example of a solid, liquid, or gas from the Mali Empire. In order to find the most accurate illustrations, we looked at online images of the Mali landscape and the clothing people wore there a long time ago. Then we looked in StoryboardThat for Scenes and Characters that were similar. Students also added speech bubbles to explain the types of matter in their comic. You can see some student samples here.


Tags: