
5th Grade Circles On The Earth
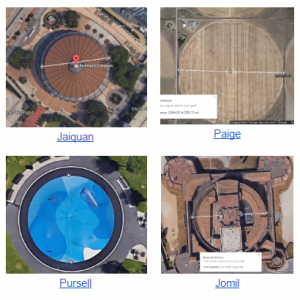 Fifth graders at Laburnum Elementary are learning about circles and their measurements: circumference, diameter, radius, and chord (SOL5.9). Today students in Ms. Henry’s class learned how to show those measurements with Google Drawings and Google Earth. First I gave them each a copy of a blank Google slideshow in Google classroom. We created a title page on the first slide, and on the second slide I showed them how to use the shapes tool to make 4 circles (hold Shift while clicking and dragging the circle to make it perfectly round). We used the paint bucket tool to change the fill color of the circles, and they discovered another new feature that I didn’t know about (I already mentioned in this post, how students found the gradient feature). If you click Custom at the bottom of the colors panel, you can adjust the fill colors’ transparency! Next, I showed them how to use the Line tool to draw a radius, diameter, and chord on different circles. We changed the color of the lines and their thicknesses using the buttons in the toolbar. Then we labeled each measurement with a text box. For the last slide I wanted them to find a real life circle in Google Earth and measure its radius, diameter or a chord. So we went to Google Maps, clicked the Google Earth button in the bottom left corner, and searched for circles. TIPS: Look near rivers for water treatment plants, look out west for crop circles (the panhandle of Texas especially), look on the roofs of buildings for fans, look in backyards for pools and trampolines. To make a measurement, right click where you want the line to start, choose “Measure distance,” then double-click where you want the line to end. Finally, students took a screenshot of their real life circle (using the Snipping Tool) and pasted it to their slideshow with a text box explaining the measurement. You can see all their slideshows here.