Author: David

3rd Grade Coding with Cycles

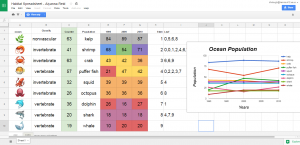
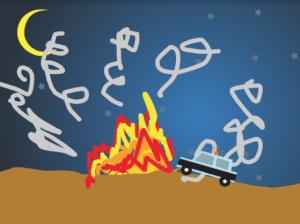
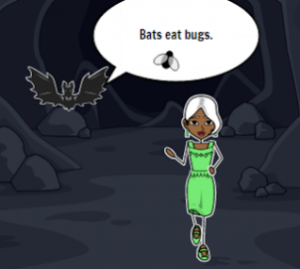
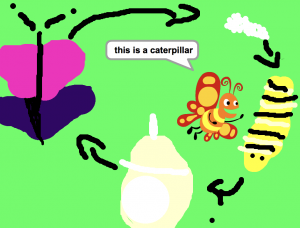
Third graders at Trevvett Elementary have been learning about cycles (SOL3.8): the lunar cycle and plant and animal life cycles. Today students in Ms. Smith’s class used basic coding skills to create animated diagrams of a cycle of their choosing. First we went to the Scratch website and created an account. Scratch is a programing language developed by MIT to teach children about coding. We started a new project and clicked the Stage button. Then we clicked the paint brush icon to create a new stage. The students used the paint tools to draw a diagram of one of the cycles. Next we right clicked on the default sprite (the Scratch character) and deleted it. I showed the students how to choose a new sprite from the sprite library. Now it was time to write some code. The students positioned their sprite where they wanted it to start. They chose “When the flag is clicked” Event to begin their code and added a “go to x-y” element from the Motion library. Then they added a “say _ for _ secs” element from the Looks library and typed the first step in the cycle. For each subsequent step, they moved their sprite to another part of the cycle, added a “glide 1 secs to x-y” Motion element and a “say _ for _ secs” Looks element until all the parts were identified. Testing the code is the most important part and provides an excellent opportunity for logical thinking and problem solving when the animation doesn’t work out as planned. When the students’ projects finally worked, they pressed the “Share” button and pasted the links to Schoology. You can see all their projects here (be sure to press the “See inside” button to take a look at their coding).


Tags:


5th Grade Habitat Stem and Leaf Plots

Fifth graders at Holladay Elementary have been learning about stem and leaf plots and line graphs in Math (SOL5.15), and they have been studying ways to classify animals and plants in Science (SOL5.5). Today students in Ms. DiMatteo’s class created stem and leaf plots and line graphs about the populations of animals and plants in different habitats. First I gave each student a copy of this Google spreadsheet (you can make a copy by clicking File > Make a copy). They clicked the arrow in box A1 and chose a habitat from the drop down list. Depending on the habitat they choose, a list of animals and plants appears. Google now has emojis (click Insert > Special Characters > Emoji), so that’s where I got the images. Next the students had to identify each one as an invertebrate, vertebrate, vascular or non-vascular plant. I tried to include at least one of each kind. (You will notice as you edit the spreadsheet the counter numbers change, that’s supposed to happen). Next the students acted like scientists and recorded the data for each year by typing the number in the counter box at that moment. The numbers have conditional formatting rules that will turn them different colors based on their tens digits (to help with the stem and leaf plot). To create the stem and leaf plot, the students type the numbers 1-9 in the Stem column (column H), and record the ones digits in the Leaf column (column I). To create the line graph, the students highlight the data in rows D-G and click the graph/chart button. Then they click the “Chart Types” tab in the window that appears and choose a line graph. They also need to check the box that says, “Switch rows/columns” so each line shows a specific living thing. Finally, I showed them how to customize the colors, titles, and labels of their graphs by clicking on each one. As we looked at our data, we discussed why there were more of the smaller creatures and less of the larger ones, and what would cause populations to increase or decrease. You can take a look at the students’ projects here.


3rd Grade Valentine Machines

Third graders at Holladay Elementary have been learning about simple machines in Science (SOL3.2) and adding and subtracting money in Math (SOL3.8). Today students in Ms. Whittaker’s class created their own Valentine machines with a money math problem for their classmates to solve. First I made a copy of a blank Google slideshow for each student in Google classroom. I showed them how to click the Background button and choose a background color. Next we moved the “Title” textbox to the top of the page, and the students typed a title for their machine. We moved the “Subtitle” textbox to the bottom of the page, and the students typed in a money math problem about their machine (adding two amounts together or calculating change). We did the written part first because that was the most important part, and I wanted to make sure it was finished. I showed them how to change the font, size, and color of their text. Then it was time to draw the machine. I demonstrated how to use the Shapes Tool to create a machine that would deliver Valentines. It could be just one simple machine, or it could be a compound machine, made of several simple machines. After the students drew their machines, they labeled the machine parts with text boxes. Finally we published them to the web (File > Publish to the web) and pasted the links to Google classroom, so we could solve each others’ problems. You can see them all here.


4th Grade Animated Revolutionary War Heroes

Fourth graders at Trevvett Elementary have been learning about Revolutionary War heroes like Thomas Jefferson, George Mason, Jack Jouett, and James Armistead Lafayette (VS.5, VS.6). Students in Ms. Adamonis’ class have each chosen a person to research and have prepared a written speech for the person describing his life and actions. Today we took their speeches and created animated faces using SitePal, so it looks and sounds like the famous heroes are actually talking. First we did a Google image search to find an image of the person. The best images are the ones where the person is facing forward. For people who don’t have a portrait online (like Jack Jouett) we searched for a Revolutionary War era/colonist costume model. Next we uploaded the image to SitePal (click Demo > Classic Demo > 3D > Create Your Own) and followed the directions to mark the eyes, nose, ears, chin, and mouth (this is important for the animation to look realistic). Then we clicked the “Audio” button and chose “TTS” (Text to Speech). We either copied and pasted our speech from our original document or typed it in the box. We chose a voice and an accent, then previewed it to be sure everything sounded correct. SitePal really helps with punctuation and spelling because you can hear right away when something isn’t right. Finally we used Screencastify to record our video and save it to our Google drive. We posted the links to Schoology, but you can take a look at some student projects here.


2nd Grade Magnet Animations

Second graders at Laburnum Elementary have been learning about magnets and how opposite poles attract and like poles repel (SOL2.2). Today students in Ms. Jones’ class created magnet animations using ABCYa!Animate. First I explained how animation works (it’s a series of still pictures that are viewed rapidly so it looks like objects in the pictures are moving). I also explained that their animations would show magnets attracting to and repelling from each other. Most students chose to draw bar magnets, but they could also have drawn horseshoe magnets. They knew to paint the north pole red, and the south pole could be any color (traditionally, it is blue or grey). We used the “Text” tool to add an “N” and an “S” at the respective poles. After they drew their first magnet, we grouped it together so we could move it as one object. Then they drew their second magnet with the opposite pole facing the first one. We grouped that one together as well. Next we used the “Copy Frame” button to copy our picture and move the magnets a little closer to each other. We also typed the word “Attract.” We continued copying the frames and moving the magnets closer to each other until the opposite poles touched. Now it was time to show “Repel.” I taught them how to flip the magnet around so like poles were facing each other (put the cursor in the corner of the magnet and click and drag the curly arrow that appears). We typed “Repel,” and copied the frames, moving the magnets further apart in each frame. Finally clicked the “Loop” button so the animation played over and over, then we exported it as a GIF. We shared our animations on Google classroom, but you can see them all here. (UPDATE: I taught a similar lesson with Ms. Ernst’s class and posted them to a Padlet).


2nd Grade 2-digit Addition or Subtraction

Second graders at Trevvett Elementary have been learning how to add and subtract two-digit numbers (SOL2.6 & 2.7), so today students in Ms. Golden’s class used Sketchtoy to animate the steps. SketchToy is a cool website that replays anything you draw. The students could choose to show the steps in solving a 2-digit addition or subtraction problem. I encouraged them to use different colors for the ones and tens. When they finished, they clicked “Save” and pasted the link to Google classroom so they could watch each others’ animations. It’s great for teachers because they can observe the process the students’ go through to solve the problems. Plus, they can speed it up, slow it down, or pause it as they watch the replay (using the play bar at the bottom). The students really enjoy how you can also add different vibrations to the sketch. After the students solved their math problems, I wanted to show them different ways to use SketchToy, so we used it to illustrate a plant growing and a frog life cycle (SOL2.4a,b). You can see all their drawings here.


1st Grade Character Feelings

First graders at Holladay Elementary have been learning how to identify characters’ feelings in stories they read, using the illustrations and context clues (SOL1.9). Today students in Ms. Sokolowski’s and Ms. Shelly’s classes drew illustrations of characters showing feelings and wrote sentences about them. Ms. Shelly’s class used ABCYa! Storymaker for this project. First they painted a character’s face showing happiness, sadness, fear, anger, or some other emotion. Then they typed a complete sentence about the character. We saved the images as PDF files and uploaded them to a Padlet, that you can see here. Ms. Sokolowski’s class used StoryboardThat for their project. StoryboardThat is a website for creating comics. The students made a 3-panel comic with three characters showing different emotions. I showed them how to use the “Edit Pose” button on each character to change their facial expressions and poses. Then we added speech bubbles, or “Textables,” and typed sentences about their emotions. We took a screenshot of the comics to save them and uploaded them to a Padlet as well. You can see their projects here (some of the situations they illustrated are quite humorous!


3rd Grade Elapsed Time Comics

Third graders at Varina Elementary have been learning about elapsed time in one-hour increments (SOL3.11b). Today, students in Ms. Long’s class created comics to show their own elapsed time math problems. First we discussed different situations that take several hours, like a sports game, a special event, or traveling. Each student thought of an idea, then we opened a 3-panel comic in StoryboardThat. I showed them how to add a background scene to each frame and how to use the “Edit Scene” button to change things in the background. Next we added characters, customized their hair and skin colors, and changed their poses and facial expressions with the “Edit Pose” button. Finally we added speech bubbles to each frame: the first one told the starting time, the second one told either the ending time or the duration (like 2 hours), and the last one asked a question about the elapsed time. We took a screenshot of our comics and posted them to Google classroom. Students answered each others’ questions in the comments. You can see all their comics here.


3rd Grade Matter Animations

Third graders at Trevvett have been learning about how matter undergoes physical and chemical changes (SOL3.3). Physical changes don’t change the type of matter, like breaking, cutting, or melting. Chemical changes change the type of matter, like burning, cooking, and rusting. Today students in Ms. Robinison’s class used ABCYa! Animate to create animations showing physical or chemical changes. First we brainstormed different types of changes they could illustrate so that we had a variety. I showed them how they could add a background image if they wanted. Next we used the paint tools and the “Images” library to create our first picture. I explained how to group objects together so they would move. Then we copied the frame and students added motion. Some showed change by adding additional parts or erasing parts of their first image. We continued copying and changing the frames until we had a complete animation of the process. Finally we uploaded our animations to an album in Schoology, and the students added comments to each others’ pictures, identifying the type of changes. You can see all their animations here.


2nd Grade Habitats & American Indians Comics

Second graders at Laburnum Elementary have been learning about animal habitats in Science (SOL2.5b) and American Indian tribes in Social Studies (SOL2.2). Today they could chose an animal or one of the three tribes (Powhatan, Lakota, and Pueblo) and create a comic with three facts. We used StoryboardThat to create the comic. First we added the background scenes. There were pictures of almost every kind of habitat for the animals, as well as pictures that look like the Eastern Woodlands, Great Plains, and southwestern desert for the tribes. I showed how they could click “Edit Scene” to change the weather in the picture. Next we clicked the “Characters” tab at the top and clicked “1600s to 1800s” for pictures of the American Indians or the “Animals” tab to find pictures of the animals they needed. The characters also have an “Edit Pose” button that allows the students to customize their poses and expressions. Finally we clicked the “Textables” tab at the top and added speech bubbles. In each speech bubble the students wrote a complete sentence with one fact (such as the animal’s habitat or the Indian’s home). We posted them to Google classroom, but you can see them all here.